First Impressions; Flying with Copilot in VSCode
I have a few deployment activities on my plate for Azure Stack HCI and AKS using PowerShell. I have been interested in GitHub Copilot, and what little I have seen is interesting but just haven’t had time to “dig in”. Figuring this was as good a time as any to try copilot in VS code to assist me in writing some PowerShell deployment scripts, I decided to jump in.
With no time to learn or research anything, I decided the best approach rather than do nothing, was to sign-up, read zero documentation and see how intuitive copilot actually is, and share my experience. You only have one opportunity to use something for the first time.
$100 for 1 year, 60-day free trial, enter a credit card, install the extension, authenticate extension, and literally within minutes had my copilot silently standing by.
Here are some impressions captured during the first 6 days of my experience.
The first thing I had to get used to, was the tab to complete the suggestions. I really just wanted to tab and suddenly I have code.

Next, I began to notice that my copilot was starting to become aware of context with variables in the page and understanding what I was trying to do. Completing repeatable patterns and adding valuable comments.

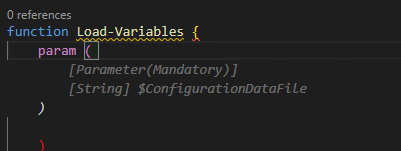
Below this case, the variable $configrationDataFile was in another open file and was actually the thing I wanted to load. Additionally, this created the Mandatory parameter correctly. I'll be honest I probably wouldn’t have added mandatory code.
Here, I had written a for each loop to invoke some commands, then realized I needed to create the PS session first. I moved the cursor up and created a new line and my copilot knew what I needed. Tab Cheers
I manually created the HCIAdminGroup variable and parameters and went to the next line, and my copilot suggested HCIClusterAdminGroup. I wondered how many more credentials it would create. All those shown in the square, I didn’t need or perhaps better said at this stage I don’t think I need them, but all good suggestions.

I was adding comments as headers to a function and discovered this is how you created a complete function. Which I then remembered was the demo I had seen. Not a bad start, Tab

tab

I spent some time on this function as it was. I didn’t capture the error from this code above but got one related. This was tough, it was trying to get a secure string from a keyvault and create a credential. I did spend more time messing with it than probably writing it.

I deleted it and thought I would try a more comprehensive comment and after knowing the issue and writing a better description, my copilot provided a better path.
There were more examples but hopefully, this gives you an impression of what the beginner, with no research experience, looked like, over my first 6 days.
Overall, I am very impressed with my complete lack of knowledge of how to use it, and how well it did “just work”. I did spend some time wrestling with the code created, perhaps I trusted it as if I had written it myself. After a few hiccups, I started taking the approach of verification and validation as the first step and simply reading it, before executing it and even deleting complete functions and trying to describe what I need more comprehensively.
I can see value in that you could create a full skeleton of a module or script just from comments and work through flow or logic issues before committing time to writing code.
This hands-on experience has motivated me to go learn about shortcut keys, settings, and other options. I might even make time to read some documentation; What I can turn on or off? what else it can actually do? I am beginning to feel a need to name my copilot.
If you have a coding project and haven’t tried GitHub Copilot, I strongly suggest signing up for 1 year and giving it a shot, no learning is required. Put a reminder in your calendar for 58 days later and decide if you want to continue coding with copilot.
On day 6, I can say for $8.30 a month, I’m pretty confident I won’t be coding solo again.
Probably spending 5 minutes to browse and read the documentation would have been helpful, though that wasn’t the point of my experiment. Getting started with GitHub Copilot in Visual Studio Code - GitHub Docs. I wonder if Copilot for PowerPoint is on the road map… “Tell ‘em he’s dreaming” ;)
Quick start shortcut keys
Trigger suggestions Atl + \
Complete suggestion TAB
Seeing alternative suggestions
OS See next suggestion See previous suggestion
macOS Option (⌥) or Alt+] Option (⌥) or Alt+[
Windows Alt+] Alt+[
Linux Alt+] Alt+[
Getting started with GitHub Copilot in Visual Studio Code - GitHub Docs

Using Developer Tools to get the Payload to Create Azure Budget Alerts for Action Groups (New-AzConsumptionBudget)
Are you trying to create a budget with PowerShell using New-AzConsumptionBudget on a resource group? You might have tried the code reference on this page New-AzConsumptionBudget (Az.Billing) | Microsoft Learn.
# If you update the sample command and try to execute
New-AzConsumptionBudget -ResourceGroupName budgetThis -Amount 60 -Name PSBudgetRG -Category Cost -StartDate 2022-11-01 -EndDate 2024-11-01 -TimeGrain Monthly
If you’re not using a subscription in an EA, you’ll get this error New-AzConsumptionBudget: Operation returned an invalid status code 'BadRequest'

Running get-error doesn’t provide much in the way of help to resolve. After further digging you’ll find the PowerShell reference page, you’ll probably find that Microsoft docs states you have to be an “EA customer, you can create and edit budgets programmatically using the Azure PowerShell module. However, we recommend that you use REST APIs to create and edit budgets because CLI commands might not support the latest version of the APIs."
If you are using EA subscription it still doesn’t create the alerts and the PowerShell doco doesn’t seem easy to use to create these notifications either.
Hopefully, you found this script SetConsumptionBudget.ps1 Create a Consumption Budget for ResourceGroups in Azure (github.com). It is a complete script and is helpful. This is a good implementation of the content documented here. Budgets - Create Or Update - REST API (Azure Consumption) | Microsoft Learn.
What if you couldn’t find a pre-created script what would you do? Or if you wanted a simplified call rather than the long doc example, in this case, I wanted to leverage using an Action Group.
Let’s create a budget through the Azure portal called “CreatedWithUI” and use the browser developer tools (F12) to capture the traffic requests to the Azure API.
After you click “Create” you’ll see traffic and see the request payload
You can copy the properties section, you just need to add the properties name back in.

With some changes to the syntax object, we can create a script to create the budget alerting an Action Group.
# Converted Syntax for use in script
$bodyObject = @{
    "properties"= @{
        "timePeriod" = @{
            "startDate"= "2022-10-01T00:00:00Z"
            "endDate"= "2024-09-30T00:00:00Z"
        }
        "timeGrain" = "Monthly"
        "amount"= 62
        "category"= "Cost"
        "notifications" =@{
            "forecasted_GreaterThan_90_Percent"= @{
                "enabled" = $true
                "operator"= "GreaterThan"
                "threshold"= 90
                "contactGroups"= @("/subscriptions/00000000-1111-2222-3333-444444444444/resourceGroups/cloudmodernization-rg/providers/microsoft.insights/actionGroups/BudgetAlerts")
                "thresholdType"= "Forecasted"
            }
        }
    }
}
The last piece of data we need is the Action Group, which still works in PowerShell
# Parameters
$ActionGroupRGName = "cloudmodernization-rg"
$ActionGroupEmails = @("admin@yourorg.com")
$ActionGroupName = "BudgetAlerts"

# Get existing action Group ID
$ActionGroupId = (Get-AzActionGroup -resourcegroup  cloudmodernization-rg  -Name BudgetAlerts).id

# Create New Action Group
$AlertEmail = New-AzActionGroupReceiver -EmailAddress $ActionGroupEmail -Name ForcastBudgetAlert
$ActionGroupId = (Set-AzActionGroup -ResourceGroupName ($cb.ResourceGroup) -Name $ActionGroupName -ShortName $ActionGroupName -Receiver $AlertEmail).Id
Finally, if you pull all this together calling Invoke-RestMethod it would like something like
# Parameters
$subscriptionId = "00000000-1111-2222-3333-444444444444"
$resourceGroupName = "cloudmodernization-rg"
$ActionGroupName = "BudgetAlerts"
$budgetName = "$resourceGroupName-cb"

# Get existing action Group ID
$ActionGroupId = (Get-AzActionGroup -resourcegroup  $resourceGroupName -Name $ActionGroupName ).id

$bodyObject = @{
    "properties"= @{
        "timePeriod" = @{
            "startDate"= "2022-10-01T00:00:00Z"
            "endDate"= "2024-09-30T00:00:00Z"
        }
        "timeGrain" = "Monthly"
        "amount"= 62
        "category"= "Cost"
        "notifications" = @{
            "forecasted_GreaterThan_90_Percent"= @{
                "enabled" = $true
                "operator"= "GreaterThan"
                "threshold"= 90
                "contactGroups"= @($ActionGroupId)
                "thresholdType"= "Forecasted"
            }
        }
    }
    "filter" =@{}
}

$bearerToken=(Get-AzAccessToken).token
$headers = @{'Authorization' = "Bearer $bearerToken"}
$RequestBody = $bodyObject | convertto-json -Depth 15

$URI = "https://management.azure.com/subscriptions/$subscriptionId/resourceGroups/$resourceGroupName/providers/Microsoft.Consumption/budgets/$budgetName"+"?api-version=2021-10-01"
Invoke-RestMethod -Method Put -ContentType "application/json; charset=utf-8" -Uri $URI -Headers $headers -Body $RequestBodyHere are the three budgets $60, $61, and $62 created through this article.
This was aimed at showing you how to get to the payload submitted to the Azure Portal to solve a problem using PowerShell and how to revert to using a direct Azure API call.

Capturing and using API queries from Azure in PowerShell with Fiddler
This is a walkthrough for using Fiddler to capture traffic to Azure from a browser and writing and running that query in PowerShell. I wrote this because I don't like posts that skip over a key step and explain the entire thing with a wave of the hand. Although this article stands on it own, it is a key step in another series.

Similar New Content: Using Developer Tools to get the Payload to Create Azure Budget Alerts for Action Groups (New-AzConsumptionBudget) — Crying Cloud
This is a walkthrough for using Fiddler to capture traffic to Azure from a browser and writing and running that query in PowerShell. I wrote this because I don't like posts that skip over a key step and explain the entire thing with a wave of the hand. Although this article stands on it own, it is a key step in another series.
Install & Configure Fiddler
https://www.telerik.com/fiddler. We need to decrypt traffic from Azure. Basically, you're letting Fiddler get in the middle of the conversation you're having with Azure and take a look at the traffic. After installation select, Tools -> Options, select capture and decrypt HTTPS traffic.

You need to close and reopen Fiddler. From the file menu, you can select start or stop, to capture internet traffic. Ensure capture is on and then refresh Azure page you want to query. In this case, I want to capture data from the cost analysis page for a resource group. This is easier when you close down most browser windows except the one you want to investigate. You can also apply filters and capture limitations, but I'll let you figure that out.

Capture Your Query
I want to capture the cost for a resource group with daily totals so we can capture the cost over the month based on resource group tagging. Browse to a resource group and select cost analysis with capture traffic.

The next part you'll just need to search through the queries and look for what you're after. Select JSON in the response to see the data returned.

In the above results we can see the rows of cost data in the JSON response page, however, the other record in the row is the resource type, not the date.

This looks better, the columns JSON field shows the Cost, Date, and Currency and we can even see some rows with the right data, so we have the query. Now to create this in PowerShell.
Create Query in PowerShell
First, grab the header and then create a few parameters. Note this is a POST command.

Raw Header
POST /subscriptions/11111111-4444-8888-9999-222222222222/YourResourceGroupName/azurestackproduction/providers/Microsoft.CostManagement/query?api-version=2018-08-31&$top=40000 HTTP/1.1
Converted
$SubscriptionGUID = '11111111-4444-8888-9999-222222222222' $ResourceGroupName = 'YourResourceGroupName' $usageUri = "https://management.azure.com/subscriptions/$SubscriptionGUID/resourceGroups/$ResourceGroupName/providers/Microsoft.CostManagement/query?api-version=2018-08-31"

We need to create the JSON object that is passed with the POST. Shown above is what we need to recreate.

Select Raw and capture the text in the brackets. This will take a little bit of effort to convert into a PowerShell JSON object with variables.
commas , become semi colons ;
the { needs a @ in front of it @{
colons : need =
RAW
{"type":"Usage","timeframe":"Custom","timePeriod":{"from":"2018-10-01T00:00:00+00:00","to":"2018-10-31T23:59:59+00:00"},"dataSet":{"granularity":"Daily","aggregation":{"totalCost":{"name":"PreTaxCost","function":"Sum"}},"sorting":[{"direction":"ascending","name":"UsageDate"}]}}
Converted
$year =(get-date).year $month =(get-date).Month $DaysInMonth= [DateTime]::DaysInMonth($year, $month ) $Body = @{"type"="Usage";"timeframe"="Custom";"timePeriod"=@{"from"="$($year)-$($month)-01T00:00:00+00:00";"to"="$($year)-$($month)-$($DaysInMonth)T23:59:59+00:00"};"dataSet"=@{"granularity"="Daily";"aggregation"=@{"totalCost"=@{"name"="PreTaxCost";"function"="Sum"}};"sorting"=@(@{"direction"="ascending";"name"="UsageDate"})}}
BearerToken
To access this data since we aren't logged in with PowerShell you need a bearer token. Luckily someone has written a helpful query to capture the bearer token from your existing session. https://gallery.technet.microsoft.com/scriptcenter/Easily-obtain-AccessToken-3ba6e593.
function Get-AzureRmCachedAccessToken() {   $ErrorActionPreference = 'Stop'

  if(-not (Get-Module AzureRm.Profile)) {     Import-Module AzureRm.Profile   }   $azureRmProfileModuleVersion = (Get-Module AzureRm.Profile).Version   # refactoring performed in AzureRm.Profile v3.0 or later   if($azureRmProfileModuleVersion.Major -ge 3) {     $azureRmProfile = [Microsoft.Azure.Commands.Common.Authentication.Abstractions.AzureRmProfileProvider]::Instance.Profile     if(-not $azureRmProfile.Accounts.Count) {       Write-Error "Ensure you have logged in before calling this function."         }   } else {     # AzureRm.Profile < v3.0     $azureRmProfile = [Microsoft.WindowsAzure.Commands.Common.AzureRmProfileProvider]::Instance.Profile     if(-not $azureRmProfile.Context.Account.Count) {       Write-Error "Ensure you have logged in before calling this function."         }   }

  $currentAzureContext = Get-AzureRmContext   $profileClient = New-Object Microsoft.Azure.Commands.ResourceManager.Common.RMProfileClient($azureRmProfile)   Write-Debug ("Getting access token for tenant" + $currentAzureContext.Subscription.TenantId)   $token = $profileClient.AcquireAccessToken($currentAzureContext.Subscription.TenantId)   $token.AccessToken }
If we include this function in our code and write a few more lines we are ready to start putting it all together. We create the headers sections, we use invoke-restmethod with POST we pass the body which must be converted with depth 100 otherwise data gets chopped out.
$token = Get-AzureRmCachedAccessToken  $headers = @{"authorization"="bearer $token"}

$results = Invoke-RestMethod $usageUri -Headers $headers -ContentType "application/json" -Method Post -Body ($body | ConvertTo-Json -Depth 100)
Final Script
$SubscriptionGUID = '11111111-4444-8888-9999-222222222222'  $ResourceGroupName = 'YourResourceGroupName'

function Get-AzureRmCachedAccessToken() {   $ErrorActionPreference = 'Stop'

  if(-not (Get-Module AzureRm.Profile)) {     Import-Module AzureRm.Profile   }   $azureRmProfileModuleVersion = (Get-Module AzureRm.Profile).Version   # refactoring performed in AzureRm.Profile v3.0 or later   if($azureRmProfileModuleVersion.Major -ge 3) {     $azureRmProfile = [Microsoft.Azure.Commands.Common.Authentication.Abstractions.AzureRmProfileProvider]::Instance.Profile     if(-not $azureRmProfile.Accounts.Count) {       Write-Error "Ensure you have logged in before calling this function."         }   } else {     # AzureRm.Profile < v3.0     $azureRmProfile = [Microsoft.WindowsAzure.Commands.Common.AzureRmProfileProvider]::Instance.Profile     if(-not $azureRmProfile.Context.Account.Count) {       Write-Error "Ensure you have logged in before calling this function."         }   }

  $currentAzureContext = Get-AzureRmContext   $profileClient = New-Object Microsoft.Azure.Commands.ResourceManager.Common.RMProfileClient($azureRmProfile)   Write-Debug ("Getting access token for tenant" + $currentAzureContext.Subscription.TenantId)   $token = $profileClient.AcquireAccessToken($currentAzureContext.Subscription.TenantId)   $token.AccessToken }

$year =(get-date).year $month =(get-date).Month $DaysInMonth= [DateTime]::DaysInMonth($year, $month )

$token =  Get-AzureRmCachedAccessToken $headers = @{"authorization"="bearer $token"} $Body =  @{"type"="Usage";"timeframe"="Custom";"timePeriod"=@{"from"="$($year)-$($month)-01T00:00:00+00:00";"to"="$($year)-$($month)-$($DaysInMonth)T23:59:59+00:00"};"dataSet"=@{"granularity"="Daily";"aggregation"=@{"totalCost"=@{"name"="PreTaxCost";"function"="Sum"}};"sorting"=@(@{"direction"="ascending";"name"="UsageDate"})}}

$usageUri = "https://management.azure.com/subscriptions/$SubscriptionGUID/resourceGroups/$ResourceGroupName/providers/Microsoft.CostManagement/query?api-version=2018-08-31"    $results = Invoke-RestMethod $usageUri -Headers $headers -ContentType "application/json" -Method Post -Body ($body | ConvertTo-Json -Depth 100)

$results.properties.columns $results.properties.rows
Results
This shows the two output selected columns and rows

Good luck creating your own queries, I hope you found this helpful.
You can find another similar article by Microsoft here

Creating a custom Windows image for MaaS
Continuing on the Maas theme from yesterday, I thought I'd put up a post about my experience with Windows imaging for MaaS. The Windows Openstack Imaging Tools are great for creating Windows images for Maas. They provide support for creating gold images, custom drivers, and pretty much anything else you'd want for custom image creation.

Continuing on the Maas theme from yesterday, I thought I'd put up a post about my experience with Windows imaging for MaaS. The Windows Openstack Imaging Tools are great for creating Windows images for Maas. They provide support for creating gold images, custom drivers, and pretty much anything else you'd want for custom image creation.
Included is support for UEFI or BIOS boot options. This is where I ran into issues. I found that Hyper-V wasn't having secureboot turned off for the VM, causing BIOS builds to fail. I found the problem and fixed it relatively easily. After successfully creating a BIOS image, and finding it wouldn't install on most of our equipment due to it being configured for UEFI, I decided to create a UEFI image.
Creating a UEFI image errored out, and so the hunt for the issue began. I won't bore you with the tedium of digging through code to figure out where the problem lay, but there are two changes that need to be made to the PS module that does most of the heavy lifting in the solution.
In the install directory, there is a file called WinImageBuilder.psm1. The first fix is to insert the following code right after line 902.
if ($DiskLayout -eq "UEFI") { $Drive = $Drive[1] }
The solution doesn't treat the disk layout as an array if UEFI is selected, so naturally the disk optomization phase fails.
Following that, the next change is after line 1006. Insert the following code:
if ($DiskLayout -ne "UEFI") { Set-VMFirmware -VMName (Get-VM).Name -EnableSecureBoot Off }
Turning off secureboot enables BIOS builds to succeed.
Once these fixes are in place, you can set your variables and have a successful build .

"....or something" he said. (PowerShell sound & speech)
Tomorrow I am on holiday and have been handing a few things over to my colleague. One task involved a PowerShell script for monitoring PowerShell jobs. He said it would be good if there was an email notification or something when the jobs had finished. email notification... boring... Or something you say... hmmm

Tomorrow I am on holiday and have been handing a few things over to my colleague. One task involved a PowerShell script for monitoring PowerShell jobs. He said it would be good if there was an email notification or something when the jobs had finished. email notification... boring... Or something you say... hmmm
How about one of those PowerShell songs, when the jobs are finished. I thought about it and realized this was a perfect match to his specification "or something". With some internet searching, a like bit of copy and paste, there is now a SoundsClips PowerShell module in the PSGallery with a few sound clips to help notify users when jobs finish.
install-module soundclips import-module soundclips

Get-SoundClipMissionImpossible Get-SoundClipCloseEncounter Get-SoundClipImperialMarch Get-SoundClipTetris  Get-SoundClipMario  Get-SoundClipHappyBirthday
While searching for sound clips, I happened across some text to speech sample code. The gears started to turn. A few minutes later... (I'm sure to the joy of my colleague) it was working. I think all my PowerShell script messages from now on will include sound clips and speech.
Get-SpeakArray @('congratulations','you have successfully deployed stuff')

Get-SpeakWhatAreYouDoing

$voice = Get-SpeakInstalledVoices | select -Last 1 Get-SpeakArray @('you call that a parameter?','You are so close, dont give up now') -voicename $voice
I am sure you can see the value add here, with text to speech, priceless. I am willing to guarantee there will be more snippets and functions added to this little gem. But for now, it's time for a holiday. I hope someone else might find this module as entertaining as I have. If you have some PowerShell sound scripts you want to be included, please don't hesitate to share below.
Topic Search
-
 Securing TLS in WAC (Windows Admin Center) https://t.co/klDc7J7R4G
Posts by Date
- March 2025 1
- February 2025 1
- October 2024 1
- August 2024 1
- July 2024 1
- October 2023 1
- September 2023 1
- August 2023 3
- July 2023 1
- June 2023 2
- May 2023 1
- February 2023 3
- January 2023 1
- December 2022 1
- November 2022 3
- October 2022 7
- September 2022 2
- August 2022 4
- July 2022 1
- February 2022 2
- January 2022 1
- October 2021 1
- June 2021 2
- February 2021 1
- December 2020 2
- November 2020 2
- October 2020 1
- September 2020 1
- August 2020 1
- June 2020 1
- May 2020 2
- March 2020 1
- January 2020 2
- December 2019 2
- November 2019 1
- October 2019 7
- June 2019 2
- March 2019 2
- February 2019 1
- December 2018 3
- November 2018 1
- October 2018 4
- September 2018 6
- August 2018 1
- June 2018 1
- April 2018 2
- March 2018 1
- February 2018 3
- January 2018 2
- August 2017 5
- June 2017 2
- May 2017 3
- March 2017 4
- February 2017 4
- December 2016 1
- November 2016 3
- October 2016 3
- September 2016 5
- August 2016 11
- July 2016 13