First Impressions; Flying with Copilot in VSCode
I have a few deployment activities on my plate for Azure Stack HCI and AKS using PowerShell. I have been interested in GitHub Copilot, and what little I have seen is interesting but just haven’t had time to “dig in”. Figuring this was as good a time as any to try copilot in VS code to assist me in writing some PowerShell deployment scripts, I decided to jump in.
With no time to learn or research anything, I decided the best approach rather than do nothing, was to sign-up, read zero documentation and see how intuitive copilot actually is, and share my experience. You only have one opportunity to use something for the first time.
$100 for 1 year, 60-day free trial, enter a credit card, install the extension, authenticate extension, and literally within minutes had my copilot silently standing by.
Here are some impressions captured during the first 6 days of my experience.
The first thing I had to get used to, was the tab to complete the suggestions. I really just wanted to tab and suddenly I have code.

Next, I began to notice that my copilot was starting to become aware of context with variables in the page and understanding what I was trying to do. Completing repeatable patterns and adding valuable comments.

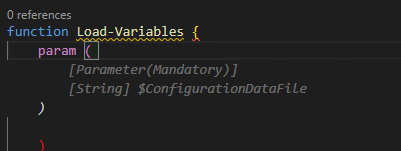
Below this case, the variable $configrationDataFile was in another open file and was actually the thing I wanted to load. Additionally, this created the Mandatory parameter correctly. I'll be honest I probably wouldn’t have added mandatory code.
Here, I had written a for each loop to invoke some commands, then realized I needed to create the PS session first. I moved the cursor up and created a new line and my copilot knew what I needed. Tab Cheers
I manually created the HCIAdminGroup variable and parameters and went to the next line, and my copilot suggested HCIClusterAdminGroup. I wondered how many more credentials it would create. All those shown in the square, I didn’t need or perhaps better said at this stage I don’t think I need them, but all good suggestions.

I was adding comments as headers to a function and discovered this is how you created a complete function. Which I then remembered was the demo I had seen. Not a bad start, Tab

tab

I spent some time on this function as it was. I didn’t capture the error from this code above but got one related. This was tough, it was trying to get a secure string from a keyvault and create a credential. I did spend more time messing with it than probably writing it.

I deleted it and thought I would try a more comprehensive comment and after knowing the issue and writing a better description, my copilot provided a better path.
There were more examples but hopefully, this gives you an impression of what the beginner, with no research experience, looked like, over my first 6 days.
Overall, I am very impressed with my complete lack of knowledge of how to use it, and how well it did “just work”. I did spend some time wrestling with the code created, perhaps I trusted it as if I had written it myself. After a few hiccups, I started taking the approach of verification and validation as the first step and simply reading it, before executing it and even deleting complete functions and trying to describe what I need more comprehensively.
I can see value in that you could create a full skeleton of a module or script just from comments and work through flow or logic issues before committing time to writing code.
This hands-on experience has motivated me to go learn about shortcut keys, settings, and other options. I might even make time to read some documentation; What I can turn on or off? what else it can actually do? I am beginning to feel a need to name my copilot.
If you have a coding project and haven’t tried GitHub Copilot, I strongly suggest signing up for 1 year and giving it a shot, no learning is required. Put a reminder in your calendar for 58 days later and decide if you want to continue coding with copilot.
On day 6, I can say for $8.30 a month, I’m pretty confident I won’t be coding solo again.
Probably spending 5 minutes to browse and read the documentation would have been helpful, though that wasn’t the point of my experiment. Getting started with GitHub Copilot in Visual Studio Code - GitHub Docs. I wonder if Copilot for PowerPoint is on the road map… “Tell ‘em he’s dreaming” ;)
Quick start shortcut keys
Trigger suggestions Atl + \
Complete suggestion TAB
Seeing alternative suggestions
OS See next suggestion See previous suggestion
macOS Option (⌥) or Alt+] Option (⌥) or Alt+[
Windows Alt+] Alt+[
Linux Alt+] Alt+[
Getting started with GitHub Copilot in Visual Studio Code - GitHub Docs

Capturing and using API queries from Azure in PowerShell with Fiddler
This is a walkthrough for using Fiddler to capture traffic to Azure from a browser and writing and running that query in PowerShell. I wrote this because I don't like posts that skip over a key step and explain the entire thing with a wave of the hand. Although this article stands on it own, it is a key step in another series.

Similar New Content: Using Developer Tools to get the Payload to Create Azure Budget Alerts for Action Groups (New-AzConsumptionBudget) — Crying Cloud
This is a walkthrough for using Fiddler to capture traffic to Azure from a browser and writing and running that query in PowerShell. I wrote this because I don't like posts that skip over a key step and explain the entire thing with a wave of the hand. Although this article stands on it own, it is a key step in another series.
Install & Configure Fiddler
https://www.telerik.com/fiddler. We need to decrypt traffic from Azure. Basically, you're letting Fiddler get in the middle of the conversation you're having with Azure and take a look at the traffic. After installation select, Tools -> Options, select capture and decrypt HTTPS traffic.

You need to close and reopen Fiddler. From the file menu, you can select start or stop, to capture internet traffic. Ensure capture is on and then refresh Azure page you want to query. In this case, I want to capture data from the cost analysis page for a resource group. This is easier when you close down most browser windows except the one you want to investigate. You can also apply filters and capture limitations, but I'll let you figure that out.

Capture Your Query
I want to capture the cost for a resource group with daily totals so we can capture the cost over the month based on resource group tagging. Browse to a resource group and select cost analysis with capture traffic.

The next part you'll just need to search through the queries and look for what you're after. Select JSON in the response to see the data returned.

In the above results we can see the rows of cost data in the JSON response page, however, the other record in the row is the resource type, not the date.

This looks better, the columns JSON field shows the Cost, Date, and Currency and we can even see some rows with the right data, so we have the query. Now to create this in PowerShell.
Create Query in PowerShell
First, grab the header and then create a few parameters. Note this is a POST command.

Raw Header
POST /subscriptions/11111111-4444-8888-9999-222222222222/YourResourceGroupName/azurestackproduction/providers/Microsoft.CostManagement/query?api-version=2018-08-31&$top=40000 HTTP/1.1
Converted
$SubscriptionGUID = '11111111-4444-8888-9999-222222222222' $ResourceGroupName = 'YourResourceGroupName' $usageUri = "https://management.azure.com/subscriptions/$SubscriptionGUID/resourceGroups/$ResourceGroupName/providers/Microsoft.CostManagement/query?api-version=2018-08-31"

We need to create the JSON object that is passed with the POST. Shown above is what we need to recreate.

Select Raw and capture the text in the brackets. This will take a little bit of effort to convert into a PowerShell JSON object with variables.
commas , become semi colons ;
the { needs a @ in front of it @{
colons : need =
RAW
{"type":"Usage","timeframe":"Custom","timePeriod":{"from":"2018-10-01T00:00:00+00:00","to":"2018-10-31T23:59:59+00:00"},"dataSet":{"granularity":"Daily","aggregation":{"totalCost":{"name":"PreTaxCost","function":"Sum"}},"sorting":[{"direction":"ascending","name":"UsageDate"}]}}
Converted
$year =(get-date).year $month =(get-date).Month $DaysInMonth= [DateTime]::DaysInMonth($year, $month ) $Body = @{"type"="Usage";"timeframe"="Custom";"timePeriod"=@{"from"="$($year)-$($month)-01T00:00:00+00:00";"to"="$($year)-$($month)-$($DaysInMonth)T23:59:59+00:00"};"dataSet"=@{"granularity"="Daily";"aggregation"=@{"totalCost"=@{"name"="PreTaxCost";"function"="Sum"}};"sorting"=@(@{"direction"="ascending";"name"="UsageDate"})}}
BearerToken
To access this data since we aren't logged in with PowerShell you need a bearer token. Luckily someone has written a helpful query to capture the bearer token from your existing session. https://gallery.technet.microsoft.com/scriptcenter/Easily-obtain-AccessToken-3ba6e593.
function Get-AzureRmCachedAccessToken() {   $ErrorActionPreference = 'Stop'

  if(-not (Get-Module AzureRm.Profile)) {     Import-Module AzureRm.Profile   }   $azureRmProfileModuleVersion = (Get-Module AzureRm.Profile).Version   # refactoring performed in AzureRm.Profile v3.0 or later   if($azureRmProfileModuleVersion.Major -ge 3) {     $azureRmProfile = [Microsoft.Azure.Commands.Common.Authentication.Abstractions.AzureRmProfileProvider]::Instance.Profile     if(-not $azureRmProfile.Accounts.Count) {       Write-Error "Ensure you have logged in before calling this function."         }   } else {     # AzureRm.Profile < v3.0     $azureRmProfile = [Microsoft.WindowsAzure.Commands.Common.AzureRmProfileProvider]::Instance.Profile     if(-not $azureRmProfile.Context.Account.Count) {       Write-Error "Ensure you have logged in before calling this function."         }   }

  $currentAzureContext = Get-AzureRmContext   $profileClient = New-Object Microsoft.Azure.Commands.ResourceManager.Common.RMProfileClient($azureRmProfile)   Write-Debug ("Getting access token for tenant" + $currentAzureContext.Subscription.TenantId)   $token = $profileClient.AcquireAccessToken($currentAzureContext.Subscription.TenantId)   $token.AccessToken }
If we include this function in our code and write a few more lines we are ready to start putting it all together. We create the headers sections, we use invoke-restmethod with POST we pass the body which must be converted with depth 100 otherwise data gets chopped out.
$token = Get-AzureRmCachedAccessToken  $headers = @{"authorization"="bearer $token"}

$results = Invoke-RestMethod $usageUri -Headers $headers -ContentType "application/json" -Method Post -Body ($body | ConvertTo-Json -Depth 100)
Final Script
$SubscriptionGUID = '11111111-4444-8888-9999-222222222222'  $ResourceGroupName = 'YourResourceGroupName'

function Get-AzureRmCachedAccessToken() {   $ErrorActionPreference = 'Stop'

  if(-not (Get-Module AzureRm.Profile)) {     Import-Module AzureRm.Profile   }   $azureRmProfileModuleVersion = (Get-Module AzureRm.Profile).Version   # refactoring performed in AzureRm.Profile v3.0 or later   if($azureRmProfileModuleVersion.Major -ge 3) {     $azureRmProfile = [Microsoft.Azure.Commands.Common.Authentication.Abstractions.AzureRmProfileProvider]::Instance.Profile     if(-not $azureRmProfile.Accounts.Count) {       Write-Error "Ensure you have logged in before calling this function."         }   } else {     # AzureRm.Profile < v3.0     $azureRmProfile = [Microsoft.WindowsAzure.Commands.Common.AzureRmProfileProvider]::Instance.Profile     if(-not $azureRmProfile.Context.Account.Count) {       Write-Error "Ensure you have logged in before calling this function."         }   }

  $currentAzureContext = Get-AzureRmContext   $profileClient = New-Object Microsoft.Azure.Commands.ResourceManager.Common.RMProfileClient($azureRmProfile)   Write-Debug ("Getting access token for tenant" + $currentAzureContext.Subscription.TenantId)   $token = $profileClient.AcquireAccessToken($currentAzureContext.Subscription.TenantId)   $token.AccessToken }

$year =(get-date).year $month =(get-date).Month $DaysInMonth= [DateTime]::DaysInMonth($year, $month )

$token =  Get-AzureRmCachedAccessToken $headers = @{"authorization"="bearer $token"} $Body =  @{"type"="Usage";"timeframe"="Custom";"timePeriod"=@{"from"="$($year)-$($month)-01T00:00:00+00:00";"to"="$($year)-$($month)-$($DaysInMonth)T23:59:59+00:00"};"dataSet"=@{"granularity"="Daily";"aggregation"=@{"totalCost"=@{"name"="PreTaxCost";"function"="Sum"}};"sorting"=@(@{"direction"="ascending";"name"="UsageDate"})}}

$usageUri = "https://management.azure.com/subscriptions/$SubscriptionGUID/resourceGroups/$ResourceGroupName/providers/Microsoft.CostManagement/query?api-version=2018-08-31"    $results = Invoke-RestMethod $usageUri -Headers $headers -ContentType "application/json" -Method Post -Body ($body | ConvertTo-Json -Depth 100)

$results.properties.columns $results.properties.rows
Results
This shows the two output selected columns and rows

Good luck creating your own queries, I hope you found this helpful.
You can find another similar article by Microsoft here

"....or something" he said. (PowerShell sound & speech)
Tomorrow I am on holiday and have been handing a few things over to my colleague. One task involved a PowerShell script for monitoring PowerShell jobs. He said it would be good if there was an email notification or something when the jobs had finished. email notification... boring... Or something you say... hmmm

Tomorrow I am on holiday and have been handing a few things over to my colleague. One task involved a PowerShell script for monitoring PowerShell jobs. He said it would be good if there was an email notification or something when the jobs had finished. email notification... boring... Or something you say... hmmm
How about one of those PowerShell songs, when the jobs are finished. I thought about it and realized this was a perfect match to his specification "or something". With some internet searching, a like bit of copy and paste, there is now a SoundsClips PowerShell module in the PSGallery with a few sound clips to help notify users when jobs finish.
install-module soundclips import-module soundclips

Get-SoundClipMissionImpossible Get-SoundClipCloseEncounter Get-SoundClipImperialMarch Get-SoundClipTetris  Get-SoundClipMario  Get-SoundClipHappyBirthday
While searching for sound clips, I happened across some text to speech sample code. The gears started to turn. A few minutes later... (I'm sure to the joy of my colleague) it was working. I think all my PowerShell script messages from now on will include sound clips and speech.
Get-SpeakArray @('congratulations','you have successfully deployed stuff')

Get-SpeakWhatAreYouDoing

$voice = Get-SpeakInstalledVoices | select -Last 1 Get-SpeakArray @('you call that a parameter?','You are so close, dont give up now') -voicename $voice
I am sure you can see the value add here, with text to speech, priceless. I am willing to guarantee there will be more snippets and functions added to this little gem. But for now, it's time for a holiday. I hope someone else might find this module as entertaining as I have. If you have some PowerShell sound scripts you want to be included, please don't hesitate to share below.

Reporting on Resource Group Tags in Azure

You might have seen either of Mike's blog posts on resource groups or resource tagging or just be looking to generate a report on resource group tags in Azure, if so, you're in the right place. Yesterday we were taking a look at our subscription and looking to clean up some resources. We needed a report to review Azure resource groups and their tags. While this relatively easy to do with PowerShell, getting a report that you can share easily was a little harder. I thought I would take some time and write a PowerShell script to generate a report utilizing ReportHTML powershell module.

Resource Group Tag Report Generated with ReportHTML
Just like most things in IT there were a few bumps in the road. Mainly that tag names are in a hashtable and that they are case sensitive. I wrote some code to auto-discover key names and it will prefix the key name with a number so you can find all case versions of a tag and correct them if needed. This report also includes a hyperlink to take you directly to the resource in Azure.
Once you know the tag names you want to report on you can specify them as an array and pass that in as a parameter. If you specify the Tag Names array the first two tag names will be used to generate some pie charts as shown above. EG -KeyNames=@("Owner","Solution"). By default, the report is generated in your temp directory. You can use the -ReportOutputPath param to specify an output path. There is also a parameter for your logo URL. It must be a small image -YouLogoHereURLString
You can view and install this report from the PowerShell Gallery here using the following Install-Script -Name run-ReportAzureResourceGroupTags
Or here is the code.
[powershell]
Param ( [parameter(Mandatory=$false,ValueFromPipeline = $true)] [Array]$KeyNames, [parameter(Mandatory=$false)] [String]$ReportOutputPath, [parameter(Mandatory=$false)] [String]$YouLogoHereURLString )
[switch]$AutoKeyName =$false $m = Get-Module -List ReportHTML if(!$m) {"Can't locate module ReportHTML. Use Install-module ReportHTML";break} else {import-module reporthtml}
if ([string]::IsNullOrEmpty($(Get-AzureRmContext).Account)) {Login-AzureRmAccount}
$RGs = Get-AzureRmResourceGroup if ($KeyNames.count -eq 0) { [switch]$AutoKeyName =$true $KeyNames = (($rgs.Tags.keys) | select -Unique) }
$SubscriptionRGs = @() foreach ($RG in $RGs) {
$myRG = [PSCustomObject]@{ ResourceGroupName = $RG.ResourceGroupName Location = $RG.Location Link = ("URL01" + "https" + "://" + "portal.azure.com/#resource" + $RG.ResourceId + "URL02" + ($RG.ResourceId.Split('/') | select -last 1) + "URL03" ) }
$i=0 foreach ($KeyName in $KeyNames) { if ($AutoKeyName) { $myRG | Add-Member -MemberType NoteProperty -Name ([string]$i + "_" + $keyname) -Value $rg.Tags.($KeyName) $i++ } else { $myRG | Add-Member -MemberType NoteProperty -Name ($keyname) -Value $rg.Tags.($KeyName) } } $SubscriptionRGs += $myRG }
$rpt = @() if ($YouLogoHereURLString -ne $null) { $rpt += Get-HTMLOpenPage -TitleText "Azure Resource Groups" -LeftLogoString $YouLogoHereURLString -RightLogoString ("https" + "://" + "azurefieldnotesblog.blob.core.windows.net/wp-ontent/2017/02/ReportHTML.png") } else { $rpt += Get-HTMLOpenPage -TitleText "Azure Resource Groups" }
if (!$AutoKeyName) { $Pie1 = $SubscriptionRGs| group $KeyNames[0] $Pie2 = $SubscriptionRGs| group $KeyNames[1]
$Pie1Object = Get-HTMLPieChartObject -ColorScheme Random $Pie2Object = Get-HTMLPieChartObject -ColorScheme Generated
$rpt += Get-HTMLContentOpen -HeaderText "Pie Charts" $rpt += Get-HTMLColumnOpen -ColumnNumber 1 -ColumnCount 2 $rpt += Get-HTMLPieChart -ChartObject $Pie1Object -DataSet $Pie1 $rpt += Get-HTMLColumnClose $rpt += Get-HTMLColumnOpen -ColumnNumber 2 -ColumnCount 2 $rpt += Get-HTMLPieChart -ChartObject $Pie2Object -DataSet $Pie2 $rpt += Get-HTMLColumnClose $rpt += Get-HTMLContentclose }
$rpt += Get-HTMLContentOpen -HeaderText "Complete List" $rpt += Get-HTMLContentdatatable -ArrayOfObjects ( $SubscriptionRGs) $rpt += Get-HTMLContentClose
$rpt += Get-HTMLClosePage
if ($ReportOutputPath -ne $null) { Save-HTMLReport -ShowReport -ReportContent $rpt -ReportName ResourceGroupTags } else { Save-HTMLReport -ShowReport -ReportContent $rpt -ReportName ResourceGroupTags -ReportPath $ReportOutputPath } [/powershell]
There is a lot more that can be done with this code so please feel free to share your ideas and code below for others. If you want to add your own logos or edit the style of the report, check out the help file here or run Get-htmlReportHelp with the module installed. I hope you find this helpful
Enjoy
Azure Table Storage and PowerShell, The Hard Way
In my previous post I gave a quick overview of the Shared Key authentication scheme used by the Azure storage service and demonstrated how authenticate and access the BLOB storage API through PowerShell. The file and queue services follow an authentication scheme that aligns with the BLOB requirements, however the table service is a bit different. I felt it might help the more tortured souls out there (like myself) if I tried to describe the nuances.
Azure Storage REST API, Consistently Inconsistent
Like the REST of all things new Microsoft (read Azure), the mantra is consistency. From a modern administrative perspective you should have a consistent experience across whatever environment and toolset you require. If you are a traditional administrator/engineer of the Microsoft stack, the tooling takes the form of PowerShell cmdlets. If you use Python, bash, etc. there is effectively equivalent tooling available. My gripes outstanding, I think Microsoft has done a tremendous job in this regard. I also make no claim that my preferences are necessarily the correct ones. The ‘inconsistencies’ I will be discussing are not really issues for you if you use the mainline SDK(s). As usual, I’ll be focusing on how things work behind the scenes and my observations.
Shared Key Authentication, but Not All Are Equal
In exploring the shared key authentication to the BLOB REST API, we generated and encoded the HTTP request signature. The string we needed to encode looked something like this:
GET
/*HTTP Verb*/
/*Content-Encoding*/
/*Content-Language*/
/*Content-Length (include value when zero)*/
/*Content-MD5*/
/*Content-Type*/
/*Date*/
/*Range*/
x-ms-date:Sun, 11 Oct 2009 21:49:13 GMT x-ms-version:2009-09-19
/*CanonicalizedHeaders*/
/myaccount/mycontainer\ncomp:metadata\nrestype:container
timeout:20
The table service takes a much simpler and yet arcane format that is encoded in an identical fashion.
GET
application/json;odata=nometadata
Mon, 15 May 2017 17:29:11 GMT
/billing73d55f68/fabriclogae0bced538344887a4021ae5c3b61cd0GlobalTime(PartitionKey='407edc6d872271f853085a7a18387784',RowKey='02519075544040622622_407edc6d872271f853085a7a18387784_ 0_2952_2640')
In this case there are far fewer headers and query parameters to deal with, however there are now fairly rigid requirements. A Date header must be specified as opposed to either Date or x-ms-date, or both in the BLOB case. A Content-Type header must also be specified as part of the signature, and no additional header details are required. The canonical resource component is very different from the BLOB service. The canonical resource still takes a format of <storage account name>/<table name>/<query parameters>. At the table service level only the comp query parameter is to be included. As an example, to query the table service properties for the storage account the request would look something like https://myaccount.table.core.windows.net?restype=service&comp=properties. The canonical resource would be /myaccount/?comp=properties.
Generating the Signature with PowerShell
We will reuse our encoding function from the previous post and include a new method for generating the signature.
Function EncodeStorageRequest
{
    [CmdletBinding()]
    param
    (
        [Parameter(Mandatory = $true,ValueFromPipeline=$true,ValueFromPipelineByPropertyName=$true)]
        [String[]]$StringToSign,
        [Parameter(Mandatory=$true,ValueFromPipelineByPropertyName=$true)]
        [String]$SigningKey
    )
    PROCESS
    {
        foreach ($item in $StringToSign)
        {
            $KeyBytes = [System.Convert]::FromBase64String($SigningKey)
            $HMAC = New-Object System.Security.Cryptography.HMACSHA256
            $HMAC.Key = $KeyBytes
            $UnsignedBytes = [System.Text.Encoding]::UTF8.GetBytes($item)
            $KeyHash = $HMAC.ComputeHash($UnsignedBytes)
            $SignedString=[System.Convert]::ToBase64String($KeyHash)
            Write-Output $SignedString
        }
    }
}

$AccountName='myaccount'
$AccessKey='vyAEEzbcnIAkLKti1leDbfrAOQBu5bx52zyCkW0fGIBCsS+DDGXpfidOeAWyg7do8ujft1mFhnz9kmliycmiXA=='
$Uri="https://$AccountName.table.core.windows.net/tables"
$SignatureParams=@{
    Resource=$Uri;
    Date=[DateTime]::UtcNow.ToString('R');
    Verb='GET';
    ContentType='application/json;odata=nometadata';
}
$RequestSignature=GetTableTokenStringToSign @SignatureParams $TableToken=EncodeStorageRequest -StringToSign $RequestSignature -SigningKey $AccessKey
$TableHeaders=[ordered]@{
    'x-ms-version'= '2016-05-31';
    'DataServiceVersion'='3.0;Netfx';
    'Accept-Charset'='UTF-8';
    'Accept'='application/json;odata=fullmetadata';
    'Date'=$SignatureParams.Date;
    'Authorization'="SharedKey $($AccountName):$($TableToken)"
}
$RequestParams=@{
    Uri=$SignatureParams.Resource;
    Method=$SignatureParams.Verb;
    Headers=$TableHeaders;
    ContentType=$SignatureParams.ContentType;
    ErrorAction='STOP'
}
$Response=Invoke-WebRequest @RequestParams -Verbose $Tables=$Response.Content | ConvertFrom-Json | Select-Object -ExpandProperty value
PS C:\WINDOWS\system32> $Tables|fl
odata.type : acestack.Tables odata.id : https://acestack.table.core.windows.net/Tables('provisioninglog') odata.editLink : Tables('provisioninglog') TableName : provisioninglog
The astute reader will notice we had to pass some different headers along. All table requests require either or both a DataServiceVersion or MaxDataServiceVersion. These values align with maximum versions of the REST API, which I won't bother belaboring. We also retrieved JSON rather than XML, and have a number of content types available to take the format in which are dictated by the Accept header. In the example we retrieved it with full OData metadata; other valid types include minimalmetadata and nometadata (atom/xml is returned from earlier data service versions). In another peculiarity XML is the only format returned for retrieving Service properties or stats.
Putting It to Greater Use With Your Old Friend OData
You likely want to actually read some data out of tables. Now that authorizing the request is out of the way it is a 'simple' manner of applying the appropriate OData query parameters. We will start with retrieving a list of all entities within a table. This will return a maximum of 1000 results (unless limited using the $top parameter) and a link to any subsequent pages of data will be returned in the response headers. In the following example we will query all entities in the fabriclogaeGlobalTime table in the fabrixstuffz storage account. In the interest of brevity I will limit this to 3 results.
$TableName='fakecustomers'
$Uri="https://$AccountName.table.core.windows.net/$TableName"
$SignatureParams=@{
    Resource=$Uri;
    Date=[DateTime]::UtcNow.ToString('R');
    Verb='POST';
    ContentType='application/json;odata=nometadata';
}
$RequestSignature=GetTableTokenStringToSign @SignatureParams $TableToken=EncodeStorageRequest -StringToSign $RequestSignature -SigningKey $AccessKey
$TableHeaders=[ordered]@{
    'x-ms-version'= '2016-05-31'
    'DataServiceVersion'='3.0;Netfx'
    'Accept-Charset'='UTF-8'
    'Accept'='application/json;odata=fullmetadata';
    'Date'=$SignatureParams.Date;
    'Authorization'="SharedKey $($AccountName):$($TableToken)"
}
$PartitionKey='mypartitionkey'
$RowKey='row771'
$TableEntity=New-Object PSobject @{
    "Address"="Mountain View";
    "Name"="Buckaroo Banzai";
    "Age"=33;
    "AmountDue"=200.23;
    "FavoriteItem"="oscillation overthruster";
    "CustomerCode@odata.type"="Edm.Guid";
    "CustomerCode"="c9da6455-213d-42c9-9a79-3e9149a57833";
    "CustomerSince@odata.type"="Edm.DateTime";
    "CustomerSince"="2008-07-10T00:00:00";
    "IsActive"=$true;
    "NumberOfOrders@odata.type"="Edm.Int64"
    "NumberOfOrders"="255";
    "PartitionKey"=$PartitionKey;
    "RowKey"=$RowKey
}
$RequestParams=@{
    Uri=$SignatureParams.Resource;
    Method=$SignatureParams.Verb;
    Headers=$TableHeaders;
    ContentType=$SignatureParams.ContentType;
    ErrorAction='STOP'
}
$Response=Invoke-WebRequest @RequestParams
This should yield a result looking like this.
Cache-Control: no-cache
Transfer-Encoding: chunked
Content-Type: application/json;odata=nometadata;streaming=true;charset=utf-8
Server: Windows-Azure-Table/1.0 Microsoft-HTTPAPI/2.0
x-ms-request-id: 56afccf3-0002-0104-0285-d382b4000000
x-ms-version: 2016-05-31
X-Content-Type-Options: nosniff
x-ms-continuation-NextPartitionKey: 1!44!NDA3ZWRjNmQ4NzIyNzFmODUzMDg1YTdhMTgzODc3ODQ-
x-ms-continuation-NextRowKey: 1!88!MDI1MTkwNjc4NDkwNDA1NzI1NjlfNDA3ZWRjNmQ4NzIyNzFmODUzMDg1YTdhMTgzODc3ODRfMF8yOTUyXzI2NDA- Date: Tue, 23 May 2017 05:27:28 GMT
{
    "value":  [
                  {
                      "PartitionKey":  "407edc6d872271f853085a7a18387784",
                      "RowKey":  "02519067840040580939_407edc6d872271f853085a7a18387784_0_2952_2640",
                      "Timestamp":  "2017-05-23T05:25:55.6307353Z",
                      "EventType":  "Time",
                      "TaskName":  "FabricNode",
                      "dca_version":  -2147483648,
                      "epoch":  "1",
                      "localTime":  "2017-05-23T05:21:07.4129436Z",
                      "lowerBound":  "2017-05-23T05:19:56.173659Z",
                      "upperBound":  "2017-05-23T05:19:56.173659Z"
                  },
                  {
                      "PartitionKey":  "407edc6d872271f853085a7a18387784",
                      "RowKey":  "02519067843040711216_407edc6d872271f853085a7a18387784_0_2952_2640",
                      "Timestamp":  "2017-05-23T05:20:53.9265804Z",
                      "EventType":  "Time",
                      "TaskName":  "FabricNode",
                      "dca_version":  -2147483648,
                      "epoch":  "1",
                      "localTime":  "2017-05-23T05:16:07.3678218Z",
                      "lowerBound":  "2017-05-23T05:14:56.1606307Z",
                      "upperBound":  "2017-05-23T05:14:56.1606307Z"
                  },
                  {
                      "PartitionKey":  "407edc6d872271f853085a7a18387784",
                      "RowKey":  "02519067846040653329_407edc6d872271f853085a7a18387784_0_2952_2640",
                      "Timestamp":  "2017-05-23T05:15:52.7217857Z",
                      "EventType":  "Time",
                      "TaskName":  "FabricNode",
                      "dca_version":  -2147483648,
                      "epoch":  "1",
                      "localTime":  "2017-05-23T05:11:07.3406081Z",
                      "lowerBound":  "2017-05-23T05:09:56.1664211Z",
                      "upperBound":  "2017-05-23T05:09:56.1664211Z"
                  }
              ]
}
You should recognize a relatively standard OData response, with our desired values present within an array as the value property. There are two response headers to note here; x-ms-continuation-NextPartitionKey and x-ms-continuation-NextRowKey. These headers are the continuation token for retrieving the next available value(s). The service will return results in pages with a maximum length of 1000 results, unless limited using the $top query parameter like the previous example. If one were so inclined, they could continue to send GET requests, including the continuation token(s) until all results are enumerated.
Creating (or updating) table entities is a slightly different exercise, which can become slightly convoluted (at least in PowerShell or other scripts). Conceptually, all that is required to create an entity is a POST request to the table resource URI with a body containing the entity and the appropriate required headers. The complexity is primarily a result of the metadata overhead associated with the server OData implementation. We'll examine this by inserting an entity into a fictional customers table.
You should end up receiving the inserted object as a response:
PS C:\Windows\system32> $Response.Content | ConvertFrom-Json
PartitionKey : mypartitionkey
RowKey : row772
Timestamp : 2017-05-23T06:17:53.7244968Z
CustomerCode : c9da6455-213d-42c9-9a79-3e9149a57833
FavoriteItem : oscillation overthruster
AmountDue : 200.23
IsActive : True
CustomerSince : 2008-07-10T00:00:00
Name : Buckaroo Banzai
NumberOfOrders : 255
Age : 33
Address : Mountain View
You should notice that the object we submitted had some extra properties not present on the inserted entity. The API requires that for any entity property where the (.Net) data type can not be automatically inferred, a type annotation must be specified. In this case CustomerCode=c9da6455-213d-42c9-9a79-3e9149a57833 is a GUID (as opposed to a string) requires a property CustomerCode@odata.type=Edm.Guid. If you would like a more complete explanation the format is detailed here.
Three ways to do the same thing
You've got to give it to Microsoft, they certainly keep things interesting. In the above example, I showed one of three ways that you can insert an entity into a table. The service supports Insert, Insert or Merge (Upsert), and Insert or Replace operations (there are also individual Replace and Merge operations). In the following example I will show the Upsert operation using the same table and entity as before.
$Uri="https://$AccountName.table.core.windows.net/$TableName(PartitionKey='$PartitionKey',RowKey='$RowKey')"
$SignatureParams=@{
    Resource=$Uri;
    Date=[DateTime]::UtcNow.ToString('R');
    Verb='MERGE';
    ContentType='application/json;odata=nometadata';
}
$RequestSignature=GetTableTokenStringToSign @SignatureParams
$TableToken=EncodeStorageRequest -StringToSign $RequestSignature -SigningKey $AccessKey $TableEntity | Add-Member -MemberType NoteProperty -Name 'NickName' -Value 'MrMan'
$TableHeaders=[ordered]@{
    'x-ms-version'= '2016-05-31'
    'DataServiceVersion'='3.0;Netfx'
    'Accept-Charset'='UTF-8'
    'Accept'='application/json;odata=fullmetadata';
    'Date'=$SignatureParams.Date;
    'Authorization'="SharedKey $($AccountName):$($TableToken)"
}
$RequestParams = @{
    Method= 'MERGE';
    Uri= $Uri;
    Body= $($TableEntity|ConvertTo-Json);
    Headers= $TableHeaders;
    ContentType= 'application/json;odata=fullmetadata'
}
$Response=Invoke-WebRequest @RequestParams
This should yield a response with the meaningful details of the operation in the headers.
PS C:\Windows\system32> $Response.Headers
Key                    Value
---                    -----
x-ms-request-id        48489e3d-0002-005c-6515-d545b8000000
x-ms-version           2016-05-31
X-Content-Type-Options nosniff
Content-Length         0
Cache-Control          no-cache
Date                   Thu, 25 May 2017 05:08:58 GMT
ETag                   W/"datetime'2017-05-25T05%3A08%3A59.5530222Z'"
Server                 Windows-Azure-Table/1.0 Microsoft-HTTPAPI/2.0
Now What?
I'm sure I've bored most of you enough already so I won't belabor any more of the operations, but I hope that I've given you a little more insight into the workings of another key element of the Azure Storage Service(s). As always, if you don't have a proclivity for doing things the hard way, feel free to check out a module supporting most of the Table (and BLOB) service functionality on the Powershell Gallery or GitHub.
Topic Search
-
 Securing TLS in WAC (Windows Admin Center) https://t.co/klDc7J7R4G
Posts by Date
- March 2025 1
- February 2025 1
- October 2024 1
- August 2024 1
- July 2024 1
- October 2023 1
- September 2023 1
- August 2023 3
- July 2023 1
- June 2023 2
- May 2023 1
- February 2023 3
- January 2023 1
- December 2022 1
- November 2022 3
- October 2022 7
- September 2022 2
- August 2022 4
- July 2022 1
- February 2022 2
- January 2022 1
- October 2021 1
- June 2021 2
- February 2021 1
- December 2020 2
- November 2020 2
- October 2020 1
- September 2020 1
- August 2020 1
- June 2020 1
- May 2020 2
- March 2020 1
- January 2020 2
- December 2019 2
- November 2019 1
- October 2019 7
- June 2019 2
- March 2019 2
- February 2019 1
- December 2018 3
- November 2018 1
- October 2018 4
- September 2018 6
- August 2018 1
- June 2018 1
- April 2018 2
- March 2018 1
- February 2018 3
- January 2018 2
- August 2017 5
- June 2017 2
- May 2017 3
- March 2017 4
- February 2017 4
- December 2016 1
- November 2016 3
- October 2016 3
- September 2016 5
- August 2016 11
- July 2016 13