
Terraform with Azure Stack Hub - Creating a VM with multiple data disks
I've recently been working with Azure Stack Hub (ASH) and needed to create some VM's with a variable number of managed data disks. It's not actually as straightforward as it should be, so here's how I achieved it.
azurerm vs. azurestack Providers
Due to differences with the ARM management endpoints for Azure and Azure Stack Hub, Hashicorp provide separate providers for each system. If anyone has used ASH, they will know that the resource providers available are a subset of Azure and are typically an older version, hence the need for different providers.
An interesting thing to check out is how often the providers are updated.
| azurerm | azurestack |
|---|---|
 |
 |
As you can see, the azurerm provider is regularly maintained, whereas azurestack is not. Why's this relevant? Well, if we want to use Terraform as our infra-as-code tool, then we have to work within the limitations.
Deploying a VM with a variable number of managed data disks
With the azurerm provider, this is quite straightforward:
- Create Network interface
- Create Managed Disk(s)
- Create VM
- Attach Managed data disks to VM
- (Optional) Run Customscript extension on the VM to configure the running VM
locals {
  data_disk_count = 4
}
resource "azurerm_resource_group" "example" {
  name     = "example-resources"
  location = "West Europe"
}

resource "azurerm_virtual_network" "example" {
  name                = "example-network"
  address_space       = ["10.0.0.0/16"]
  location            = azurerm_resource_group.example.location
  resource_group_name = azurerm_resource_group.example.name
}

resource "azurerm_subnet" "example" {
  name                 = "internal"
  resource_group_name  = azurerm_resource_group.example.name
  virtual_network_name = azurerm_virtual_network.example.name
  address_prefixes     = ["10.0.2.0/24"]
}

resource "azurerm_network_interface" "example" {
  name                = "example-nic"
  location            = azurerm_resource_group.example.location
  resource_group_name = azurerm_resource_group.example.name

  ip_configuration {
    name                          = "internal"
    subnet_id                     = azurerm_subnet.example.id
    private_ip_address_allocation = "Dynamic"
  }
}

resource "tls_private_key" "ssh_key" {
  algorithm = "RSA"
  rsa_bits  = 4096
}

resource "azurerm_linux_virtual_machine" "example" {
  name                = "example-machine"
  resource_group_name = azurerm_resource_group.example.name
  location            = azurerm_resource_group.example.location
  size                = "Standard_F2"
  admin_username      = "adminuser"
  network_interface_ids = [
    azurerm_network_interface.example.id,
  ]

  admin_ssh_key {
    username   = "adminuser"
    public_key = tls_private_key.ssh_key.public_key_openssh
  }

  os_disk {
    caching              = "ReadWrite"
    storage_account_type = "Standard_LRS"
  }

  source_image_reference {
    publisher = "Canonical"
    offer     = "0001-com-ubuntu-server-jammy"
    sku       = "22_04-lts"
    version   = "latest"
  }
}

resource "azurerm_managed_disk" "example" {
  count                = local.data_disk_count
  name                 = "${azurerm_linux_virtual_machine.example.name}-data-${count.index}"
  resource_group_name  = azurerm_resource_group.example.name
  location             = azurerm_resource_group.example.location
  storage_account_type = "Premium_LRS"
  create_option        = "Empty"
  disk_size_gb         = 256
}
resource "azurerm_virtual_machine_data_disk_attachment" "example" {
  depends_on = [
    azurerm_managed_disk.example,
    azurerm_linux_virtual_machine.example
  ]
  count              = local.data_disk_count
  managed_disk_id    = azurerm_managed_disk.example[count.index].id
  virtual_machine_id = azurerm_linux_virtual_machine.example.id
  lun                = count.index
  caching            = "ReadWrite"
}


resource "null_resource" "output_ssh_key" {
  triggers = {
    always_run = "${timestamp()}"
  }
   provisioner "local-exec" {
    command = "echo '${tls_private_key.ssh_key.private_key_pem}' > ./${azurerm_linux_virtual_machine.example.name}.pem"
  }
}
The code above uses the azurerm_virtual_machine_data_disk_attachment resource. When using the azurerm_linux_virtual_machine, this is the only option available to us. Reading the documentation notes:
⚠️ NOTE:
Data Disks can be attached either directly on the
azurerm_virtual_machine resource, or using theazurerm_virtual_machine_data_disk_attachmentresource - but the two cannot be used together. If both are used against the same Virtual Machine, spurious changes will occur.
There's no method to attach directly using the azurerm_virtual_machine_data_disk_attachment resource.
If we check the resources available with the azurestack provider, we'll see that we can't use the above technique as azurerm_virtual_machine_data_disk_attachment does not exist.

That means the only option is to use azurestack_virtual_machine resource and attach the disks directly when the VM is created.
Implemetation for Azure Stack Hub
We could just create multiple storage_data_disk blocks within the azurestack_virtual_machine resource, but we want to account for variable number of disks.
To do this we need to use the dynamic blocks capability to generate nested blocks, as the count meta-argument does not work in this instance.
I first setup a map object with the name of each data disk and lun, as can be seen in the locals block in the code below.
This map of objects can then be iterated through to generate the nested block using the for_each meta-argument
The code block in question:
dynamic "storage_data_disk" {
    for_each = {for count, value in local.disk_map :   count => value}
    content {
      name              = storage_data_disk.value.disk_name
      managed_disk_type = "Standard_LRS"
      create_option     = "Empty"
      disk_size_gb      = 256
      lun               = storage_data_disk.value.lun
    }
  }
Example
locals {
  data_disk_count = 4
  vm_name         = "example-machine"
  disk_map = [
    for i in range(local.data_disk_count) :  {
      disk_name = format("%s_disk_%02d", local.vm_name, i+1)
      lun  = i
    }
  ]
}
resource "azurestack_resource_group" "example" {
  name     = "example-resources"
  location = "West Europe"
}

resource "azurestack_virtual_network" "example" {
  name                = "example-network"
  address_space       = ["10.0.0.0/16"]
  location            = azurestack_resource_group.example.location
  resource_group_name = azurestack_resource_group.example.name
}

resource "azurestack_subnet" "example" {
  name                 = "internal"
  resource_group_name  = azurestack_resource_group.example.name
  virtual_network_name = azurestack_virtual_network.example.name
  address_prefix       = ["10.0.2.0/24"]
}

resource "azurestack_network_interface" "example" {
  name                = "example-nic"
  location            = azurestack_resource_group.example.location
  resource_group_name = azurestack_resource_group.example.name

  ip_configuration {
    name                          = "internal"
    subnet_id                     = azurestack_subnet.example.id
    private_ip_address_allocation = "Dynamic"
  }
}

resource "tls_private_key" "ssh_key" {
  algorithm = "RSA"
  rsa_bits  = 4096
}

resource "azurestack_virtual_machine" "example" {
  name                  = "example-machine"
  resource_group_name   = azurestack_resource_group.example.name
  location              = azurestack_resource_group.example.location
  vm_size               = "Standard_F2"
  network_interface_ids = [
    azurestack_network_interface.example.id,
  ]

  os_profile {
    computer_name  = local.vm_name
    admin_username = "adminuser"
  }

  os_profile_linux_config {
    disable_password_authentication = true
    ssh_keys {
      path     = "/home/adminuser/.ssh/authorized_keys"
      key_data = tls_private_key.pk.public_key_openssh
    }
  }

  storage_image_reference {
    publisher         = "Canonical"
    offer             = "0001-com-ubuntu-server-jammy"
    sku               = "22_04-lts"
    version           = "latest"
  }
  storage_os_disk {
    name              = "${local.vm_name}-osdisk"
    create_option     = "FromImage"
    caching           = "ReadWrite"
    managed_disk_type = "Standard_LRS"
    os_type           = "Linux"
    disk_size_gb      = 60
  }

  dynamic "storage_data_disk" {
    for_each = {for count, value in local.disk_map :   count => value}
    content {
      name              = storage_data_disk.value.disk_name
      managed_disk_type = "Standard_LRS"
      create_option     = "Empty"
      disk_size_gb      = 256
      lun               = storage_data_disk.value.lun
    }
  }


resource "null_resource" "output_ssh_key" {
  triggers = {
    always_run = "${timestamp()}"
  }
   provisioner "local-exec" {
    command = "echo '${tls_private_key.ssh_key.private_key_pem}' > ./${azurestack_linux_virtual_machine.example.name}.pem"
  }
}Azure CLI: Determining location of CA certs to work with Azure Stack Hub/ASDK
I’ve been doing some work on Azure Stack HUB (ASH) and ASDK recently, and the perennial problem with certificates has raised it’s head again. This is a quick blog post for anyone using Linux and Azure CLI to administer to figure out where you should store the CA root certificates, as the documentation is somewhat vague.
First, make sure you install the latest version of Az cli and not version 2.29, as that version has CVE’s (versions prior to 2.40.0 are affected)
Once installed, check the version and what Python version is used (We need to make sure that any Python commands we are running uses this version. )
az --versionNext, install pip for the python version the az cli is using (in this case it’s Python 3.9. but future versions could change)
curl https://bootstrap.pypa.io/get-pip.py -o get-pip.py
python3.9 get-pip.py
Install the Certifi module:
pip install certifiNow you can determine where the cacert.pem file is located as used by az cli:
python3.9 -c "import certifi; print(certifi.where())"
Now you can add the ASH or ASDK CA certs to the store for use by Azure CLI:
cat <CA Cert>.pem >> ~/.local/lib/python3.9/site-packages/certifi/cacert.pemYou can use the docs here to obtain the CA root certificate, or if you’re running a Linux VM from within ASH/ASDK, simply run:
sudo cat /var/lib/waagent/Certificates.pem >> ~/.local/lib/python3.9/site-packages/certifi/cacert.pem- If you were to follow the Microsoft docs, I found az cli would still not be able to communicate successfully.

It is necessary to run the following:
export REQUESTS_CA_BUNDLE=~/.local/lib/python3.9/site-packages/certifi/cacert.pem
# RECOMMENDED: set the env var automatically for your subsequent sessions
echo 'export REQUESTS_CA_BUNDLE=~/.local/lib/python3.9/site-packages/certifi/cacert.pem' >> ~/.bash_profile
As you can see above, I have been able to run az cli targeting ASDK, whereas before, it would throw the SSL error.
Tested on CentOS 8 and Rocky Linux 8.5

Deploying ASDK 2206 to an Azure VM
Azure Stack Hub version 2206 was release a couple of months ago, but anyone trying to deploy ASDK 2206 to Azure will have found that the latest version is 2108. Until the official method is updated, here’s how you can do it .
I’m using the awesome scripts by Yagmur Sahin as the basis for the solution: https://github.com/yagmurs/AzureStack-VM-PoC
Open the Azure portal and then create a PowerShell Cloud Shell.
I recommend you reset the user settings, as there can be issues with versions of the Azure PowerShell modules.


Run the following command in the new PowerShell session:
git clone https://github.com/dmc-tech/AzureStack-VM-PoC.git
Run the following, changing to meet your requirements. VirtualMachineSize can be from the following sizes:
"Standard_E32s_v3",
"Standard_E48s_v3"
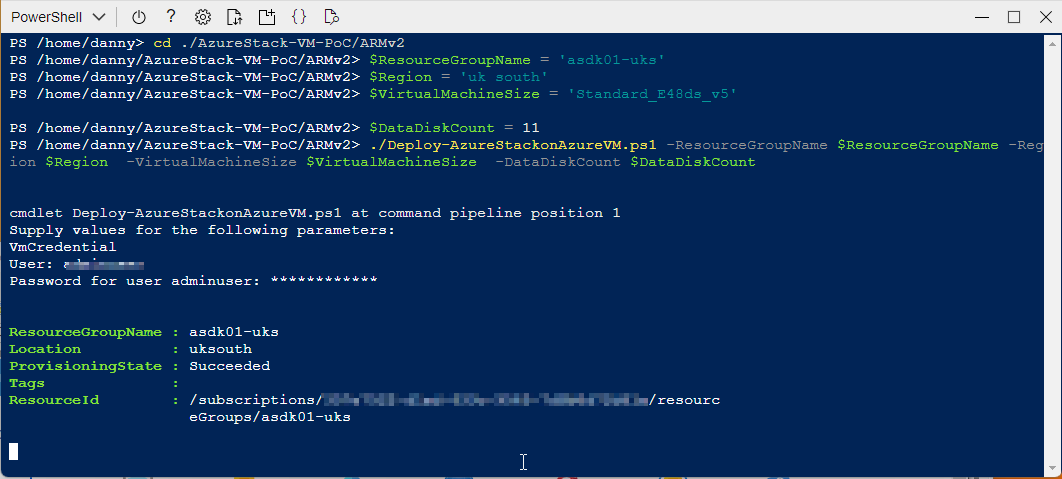
cd ./AzureStack-VM-PoC/ARMv2

$ResourceGroupName = 'asdk01-uks'
$Region = 'uk south'
$VirtualMachineSize = 'Standard_E48s_v3'
$DataDiskCount = 11

./Deploy-AzureStackonAzureVM.ps1 -ResourceGroupName $ResourceGroupName -Region $Region  -VirtualMachineSize $VirtualMachineSize  -DataDiskCount $DataDiskCount
The configuration example above has enough resources to run an OpenShift cluster.
Running the script will initially:
Create a resource group
Create a storage account
copy the ASDK 2206 VHD image to the storage account
Create the VM using the VHD image
Create a Public IP for the VM
Note: As part of the provisioning process, the admin user account you specify gets changed to ‘Administrator’. I would Strongly recommend removing the Public IP associated with the VM and deploy Azure Bastion to protect your ASDK instance
Once the ASDK VM has been provisioned, connect to it (Bastion or RDP). The username you specified previously is ignored, so use ‘Administrator’ as the user and enter the password you defined.

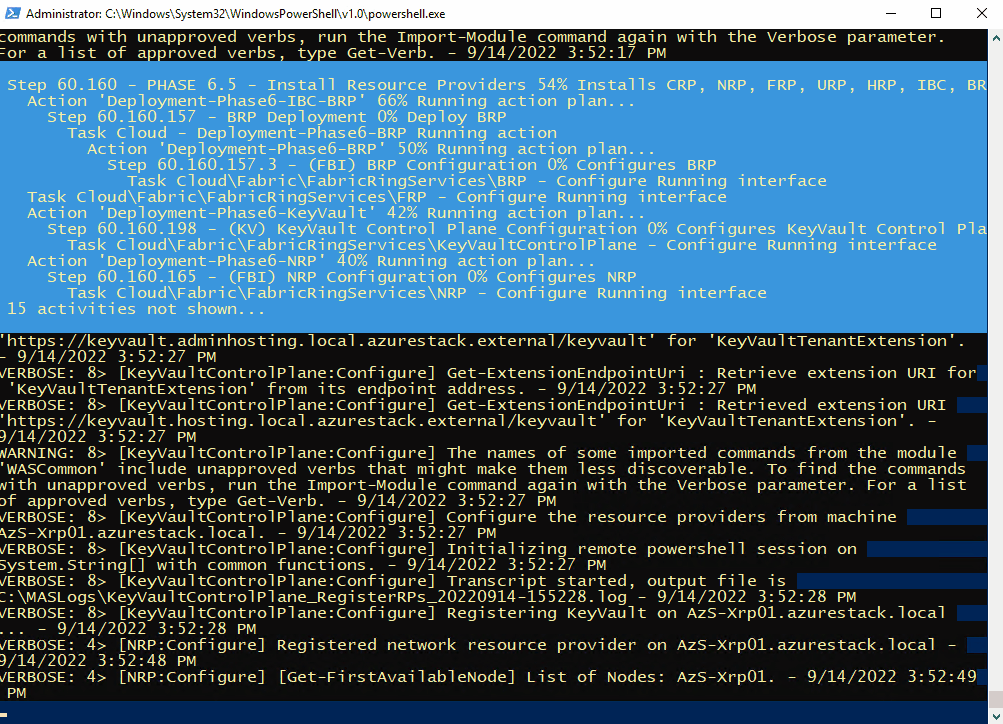
Once connected, open a PowerShell window (as Administrator), and run the following as an example (I’m using ADFS as I’m simulating a disconnected environment)
C:\CloudDeployment\Setup\InstallAzureStackPOC.ps1 -TimeServer '129.6.15.28' -DNSForwarder '8.8.8.8' -UseADFSYou’ll then need to enter the AdminPassword when prompted, and then the script will do it’s magic (as long as the password is correct!) and take a number of hours to install.

The above recording shows the first few minutes of the script (sped-up! :) ).
After a few hours, the VM will reboot. If you want to check progress, you should use the following username to connect:
azurestackadmin@azurestack.local
Use the password you initially defined

Here’s some of the output you’ll see from PowerShell if you do connect as azurestackadmin (there’s still a few hours left to go!)
After 7hours 25 minutes, the install completed. You can determine this from the following log entry:

To prove that version 2206 has been installed, open the admin portal and check the properties for the region/instance.
As I used ADFS for this example, I had to login as cloudadmin@azurestack.local. If using AAD use the account you define when initially running the setup script.
Hope that helps if you want to deploy version 2206 as well as a simplified deployment tutorial.
Footnote: I tried using v5 series VM’s to deploy ASDK on, but it failed due to a network issue. I assume it is due to a different NIC/drive being used than the v3 series.
ASDK 2008 installation fix
Here’s a quick post on installing ASDK 2008, as there seems to have been a recent change to the names of Azure AD roles that causes the ASDK install routine to fail when it is checking to see if the supplied Azure AD account has the correct permissions on the AAD tenant.
Following the installation docs: https://docs.microsoft.com/en-us/azure-stack/asdk/asdk-install?view=azs-2008, after a short time of running the PowerShell routine you will be prompted for the Azure AD global admin account. Once you’ve done this, it will be verified, but will fail with an error similar to below:
Get-AzureAdTenantDetails : The account you entered 'admin@contoso.onmicrosoft.com' is not an administrator of any Azure Active
Directory tenant.
At C:\CloudDeployment\Setup\Common\InstallAzureStackCommon.psm1:546 char:27
+ ... ntDetails = Get-AzureAdTenantDetails -AADAdminCredential $InfraAzureD ...
+                 ~~~~~~~~~~~~~~~~~~~~~~~~~~~~~~~~~~~~~~~~~~~~~~~~~~~~~~~~~
    + CategoryInfo          : NotSpecified: (:) [Write-Error], WriteErrorException
    + FullyQualifiedErrorId : Microsoft.PowerShell.Commands.WriteErrorException,Get-AzureADTenantDetails
The reason for this is that there is a function called Get-AADTenantDetail in the c:\CloudDeployment\Setup\Common\AzureADConfiguration.psm1 module that checks if the supplied account has the correct permissions. It currently checks for “Company Administrator”, but that name no longer exists, it should be changed to “Global Administrator” .
To fix this, edit c:\CloudDeployment\Setup\Common\AzureADConfiguration.psm1, and navigate to line 339. Make the following change:
$roleOid = Invoke-Graph -method Get -uri $getUri -authorization $authorization | Select-Object -ExpandProperty Value | Where displayName -EQ 'Global Administrator' | Select-Object -ExpandProperty objectIdNote: In order to see the module that needs the change, you have to run through the install routine once and let it fail, as it expands the setup directories from a NuGet package if they don’t exist.
If you re-run the install routine, it should get past this stage (assuming the account you provided is a global admin for the tenant :) )

Rotating Event Hubs RP External Certificate on Azure Stack Hub
I have been testing the Event Hubs public preview release for Azure Stack Hub, looking at the install process and what kind of actions an Operator would need to do to keep things running. One of the important ones for me, are rotating secrets / certificates. If your certificates expire, you won’t be able to access the RP, hence the importance.
If you check the current documentation for rotating secrets , it is the generic instructions for rotating external certificates for the Azure Stack Hub Stamp. I expect that this will be corrected in the near future, but until then , how do you do go about it for the Public Preview?
Firstly, you need the latest version of the Azure Stack Hub PowerShell modules:
Then you need to connect to your Azure Stack Hub Admin environment. Use the steps detailed in the following article : https://docs.microsoft.com/en-us/azure-stack/operator/azure-stack-powershell-configure-admin?view=azs-2002
(Remember if using the Az Module to rename the Commands per https://docs.microsoft.com/en-us/azure-stack/operator/powershell-install-az-module?view=azs-2002#7-use-the-az-module)
Copy the Event Hubs pfx file to a local directory and run the following script (The example is using theAz module)t:
$ProductId = 'microsoft.eventhub'
$productVersion = (Get-AzsProductDeployment -ProductId microsoft.eventhub).properties.deployment.version
$PackageId = ('{0}.{1}' -f $ProductId, $productVersion)
$packageSecret = ((Get-AzsProductSecret -PackageId $PackageId).value.name).split('/')[2]
$certPath = 'C:\AzsCerts\EventHubs\cert.pfx'

$pfxPassword = (ConvertTo-SecureString '<pfxPassword>' -AsPlainText -Force)
Set-AzsProductSecret -PackageId $PackageId -SecretName $packageSecret -PfxFileName $certPath  -PfxPassword $pfxPassword -Force -Verbose

Invoke-AzsProductRotateSecretsAction -ProductId $ProductId
Modify the $certPath variable and <pfxPassword> to match what you have set and then run the script.
The process will take quite a long time to complete. Whilst the operation is taking place, you will receive the status of the command.
If you choose to stop the CmdLet/script, the process will continue in the background. You can check the status at anytime by running the following:
(Get-AzsProductDeployment -ProductId microsoft.eventhub).propertiesYou should see something like this when the process is still running:
… and when successfully finished:
Hope that helps until the official documentation is released!
Article updated 16 July 2020 with an updated method to obtain the secret name, provided by @kongou_ae - Thanks!
Topic Search
-
 Securing TLS in WAC (Windows Admin Center) https://t.co/klDc7J7R4G
Posts by Date
- March 2025 1
- February 2025 1
- October 2024 1
- August 2024 1
- July 2024 1
- October 2023 1
- September 2023 1
- August 2023 3
- July 2023 1
- June 2023 2
- May 2023 1
- February 2023 3
- January 2023 1
- December 2022 1
- November 2022 3
- October 2022 7
- September 2022 2
- August 2022 4
- July 2022 1
- February 2022 2
- January 2022 1
- October 2021 1
- June 2021 2
- February 2021 1
- December 2020 2
- November 2020 2
- October 2020 1
- September 2020 1
- August 2020 1
- June 2020 1
- May 2020 2
- March 2020 1
- January 2020 2
- December 2019 2
- November 2019 1
- October 2019 7
- June 2019 2
- March 2019 2
- February 2019 1
- December 2018 3
- November 2018 1
- October 2018 4
- September 2018 6
- August 2018 1
- June 2018 1
- April 2018 2
- March 2018 1
- February 2018 3
- January 2018 2
- August 2017 5
- June 2017 2
- May 2017 3
- March 2017 4
- February 2017 4
- December 2016 1
- November 2016 3
- October 2016 3
- September 2016 5
- August 2016 11
- July 2016 13