ASDK 2008 installation fix
Here’s a quick post on installing ASDK 2008, as there seems to have been a recent change to the names of Azure AD roles that causes the ASDK install routine to fail when it is checking to see if the supplied Azure AD account has the correct permissions on the AAD tenant.
Following the installation docs: https://docs.microsoft.com/en-us/azure-stack/asdk/asdk-install?view=azs-2008, after a short time of running the PowerShell routine you will be prompted for the Azure AD global admin account. Once you’ve done this, it will be verified, but will fail with an error similar to below:
Get-AzureAdTenantDetails : The account you entered 'admin@contoso.onmicrosoft.com' is not an administrator of any Azure Active
Directory tenant.
At C:\CloudDeployment\Setup\Common\InstallAzureStackCommon.psm1:546 char:27
+ ... ntDetails = Get-AzureAdTenantDetails -AADAdminCredential $InfraAzureD ...
+                 ~~~~~~~~~~~~~~~~~~~~~~~~~~~~~~~~~~~~~~~~~~~~~~~~~~~~~~~~~
    + CategoryInfo          : NotSpecified: (:) [Write-Error], WriteErrorException
    + FullyQualifiedErrorId : Microsoft.PowerShell.Commands.WriteErrorException,Get-AzureADTenantDetails
The reason for this is that there is a function called Get-AADTenantDetail in the c:\CloudDeployment\Setup\Common\AzureADConfiguration.psm1 module that checks if the supplied account has the correct permissions. It currently checks for “Company Administrator”, but that name no longer exists, it should be changed to “Global Administrator” .
To fix this, edit c:\CloudDeployment\Setup\Common\AzureADConfiguration.psm1, and navigate to line 339. Make the following change:
$roleOid = Invoke-Graph -method Get -uri $getUri -authorization $authorization | Select-Object -ExpandProperty Value | Where displayName -EQ 'Global Administrator' | Select-Object -ExpandProperty objectIdNote: In order to see the module that needs the change, you have to run through the install routine once and let it fail, as it expands the setup directories from a NuGet package if they don’t exist.
If you re-run the install routine, it should get past this stage (assuming the account you provided is a global admin for the tenant :) )

Hands on with Azure Arc enabled data services on AKS HCI - part 2
This is part 2 in a series of articles on my experiences of deploying Azure Arc enabled data services on Azure Stack HCI AKS.
Part 1 discusses installation of the tools required to deploy and manage the data controller.
Part 2 describes how to deploy and manage a PostgreSQL hyperscale instance.
Part 3 describes how we can monitor our instances from Azure.
First things first, the PostgreSQL extension needs to be installed within Azure Data Studio. You do this from the Extension pane. Just search for ‘PostgreSQL’ and install, as highlighted in the screen shot below.

I found that with the latest version of the extension (0.2.7 at time of writing) threw an error. The issue lies with the OSS DB Tools Service that gets deployed with the extension, and you can see the error from the message displayed below.

After doing a bit of troubleshooting, I figured out that VCRUNTIME140.DLL was missing from my system. Well, actually, the extension does have a copy of it, but it’s not a part of the PATH, so can’t be used. Until a new version of the extension resolves this issue, there are 2 options you can take to workaround this.
Install the Visual C++ 2015 Redistributable to your system (Preferred!)
Copy VCRUNTIME140.DLL to %SYSTEMROOT% (Most hacky; do this at own risk!)
You can find a copy of the DLL in the extension directory:
%USERPROFILE%\.azuredatastudio\extensions\microsoft.azuredatastudio-postgresql-0.2.7\out\ossdbtoolsservice\Windows\v1.5.0\pgsqltoolsservice\lib\_pydevd_bundle
Make sure to restart Azure Data Studio and check that the problem is resolved by checking the output from the ossdbToolsService. The warning message doesn’t seem to impair the functionality of the extension, so I ignored it.

Now we’re ready to deploy a PostgreSQL cluster. Within ADS, we have two ways to do this.
1. Via the data controller management console:
2. From the Connection ‘New Deployment…’ option. Click on the ellipsis (…) to present the option.

Whichever option you choose, the next screen that is presented are similar to one another. The example I‘ve shown is via the ‘New Connection’ path and shows more deployment types. Installing via the data controller dashboard, the list is filtered to what can be deployed to the cluster (the Azure Arc options).

Select PostgreSQL Hyperscale server groups - Azure Arc (preview), make sure that the T&C’s acceptance is checked and then click on Select.
The next pane that’s displayed is where we defined the parameters for the PostgreSQL instance. I’ve highlighted the options you must fill in as a minimum. In the example, I’ve set the number of workers to 3. By default it is set to 0. If you leave it as the default, a single worker is deployed.
Note: If you’re deploying more than one instance to your data controller. make sure to seta unique Port for each server group. The default is 5432

Clicking on Deploy runs through the generated Jupyter notebook.

After a short period (minutes), you should see it has successfully deployed.

ADS doesn’t automatically refresh the data controller instance, so you have to manually do this.

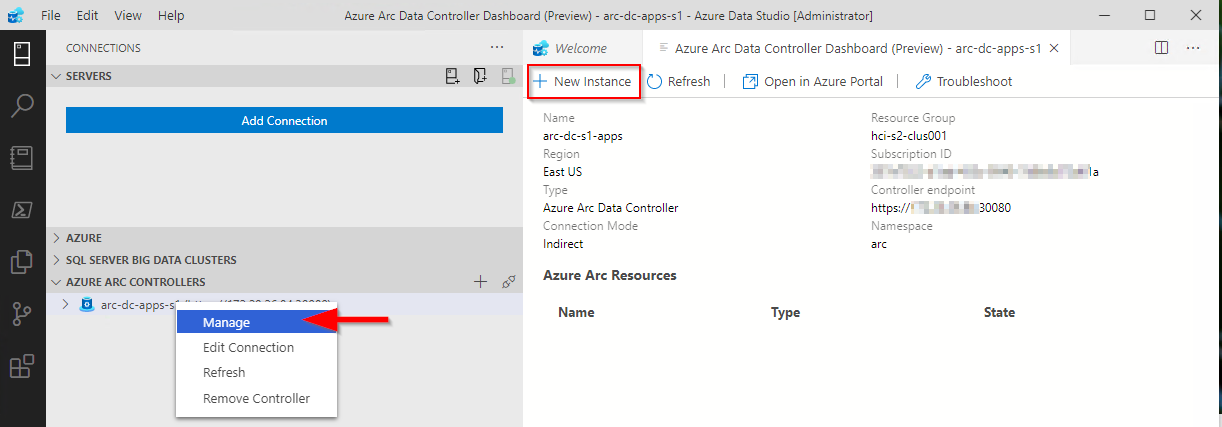
Once refreshed, you will see the instance you have deployed. Right click and select Manage to open the instance management pane.

As you can see, it looks and feels similar to the Azure portal.
If you click on the Kibana or Grafana dashboard links, you can see the logs and performance metrics for the instance.
Note: The Username and password are are what you have set for the data controller, it is not the password you set for the PostgreSQL instance.

Example Kibana logs

Grafana Dashboard
From the management pane, we can also retrieve the connection strings for our PostgreSQL instance. It gives you the details for use with various languages.

Finally in settings, Compute + Storage in theory allows you to change the number of worker nodes and the configuration per node. In reality, this is read-only from within ADS, as changing any of the values and saving them has no effect. If you do want to change the config, we need to revert to the azdata CLI. Jump here to see how you do it.

In order to work with databases and tables on the newly deployed instance, we need to add our new PostgreSQL server to ADS.
From Connection strings on our PostgreSQL dashboard, make a note of the host IP address and port, we’ll need this to add our server instance.

From the Connections pane in ADS, click on Add Connection.
From the new pane enter the parameters:
| Parameter | Value |
|---|---|
| Connection type | PostgreSQL |
| Server name | name you gave to the instance |
| User name | postgres |
| Password | Password you specified for the postgreSQL deployment |
| Database name | Default |
| Server group | Default |
| Name (Optional) | blank |
Click on Advanced, so that you can specify the host IP address and port

Enter the Host IP Address previously noted, and set the port (default is 5432)

Click on OK and then Connect. If all is well, you should see the new connection.

Scaling Your Instance
As mentioned before, if you want to be modify the running configuration of your instance, you’ll have to use the azdata CLI.
First, make sure you are connected and logged in to your data controller.
azdata login --endpoint https://<your dc IP>:30080
Enter the data controller admin username and password

To list the postgreSQL servers that are deployed, run the following command:
azdata arc postgres server list
To show the configuration of the server:
azdata arc postgres server show -n postgres01
Digging through the JSON, we can see that the only resources requested is memory. By default, each node will use 0.25 cores.

I’m going to show how to increase the memory and cores requested. For this example, I want to set 1 core and 512Mb
azdata arc postgres server edit -n postgres01 --cores-request 1 --memory-request 512Mi
If we show the config for our server again, we can see it has been updated successfully

You can also increase the number of workers using the following example
azdata arc postgres server edit -n postgres01 --workers 4Note: With the preview, reducing the number of workers is not supported.

If you do make any changes via azdata, you will need to close existing management panes for the instance and refresh the data controller instance within ADS for them to be reflected.


Currently, there does not appear to be a method to increase the allocated storage via ADS or the CLI, so make sure you provision your storage sizes sufficiently at deployment time.
You can deploy more than one PostgreSQL server group to you data controller, the only thing you will need to change is the name and the port used

You can use this command to show a friendly table of the port that the server is using:
azdata arc postgres server show -n postgres02 --query "{Server:metadata.name, Port:spec.service.port}" --output table
In the next post, I’ll describe how to upload logs and metrics to Azure for your on-prem instances.

Managing AKS HCI Clusters from your workstation
In this article, I’m going to show you how you can manage your minty fresh AKS HCI clusters that have been deployed by PowerShell, from your Windows workstation. It will detail what you need to do to obtain the various config files required to manage the clusters, as well as the tools (kubectl and helm).
I want to run this from a system that isn’t one the HCI cluster nodes, as I wanted to test a ‘real life’ scenario. I wouldn’t want to be installing tools like helm on production HCI servers, although it’s fine for kicking the tires.
Mainly I’m going to show how I’ve automated the installation of the tools, the onboarding process for the cluster to Azure Arc, and also deploying Container Insights, so the AKS HCI clusters can be monitored.
TL;DR - jump here to get the script and what configuration steps you need to do to run it
Here’s the high-level steps:
Install the Az PoSh modules
Connect to a HCI cluster node that has the AksHCI PoSh module deployed (where you ran the AKS HCI deployment from)
Copy the kubectl binary from the HCI node to your Win 10 system
Install Chocolatey (if not already installed)
Install Helm via Choco
Get the latest Container Insights deployment script
Get the config files for all the AKS HCI clusters deployed to the HCI cluster
Onboard the cluster to Arc if not already completed
Deploy the Container Insights solution to each of the clusters
Assumptions
connectivity to the Internet.
Steps 1 - 5 of the Arc for Kubernetes onboarding have taken place and the service principal has required access to carry out the deployment. Detailed instructions are here
You have already deployed one or more AKS HCI clusters.
Install the Az PoSh Modules
We use the Az module to run some checks that the cluster has been onboarded to Arc. The enable-monitoring.ps1 script requires these modules too.
Connect to a HCI Node that has the AksHci PowerShell module deployed
I’m making the assumption that you will have already deployed your AKS HCI cluster via PowerShell, so one of the HCI cluster nodes already has the latest version of the AksHci PoSh module installed. Follow the instructions here if you need guidance.
In the script I wrote, the remote session is stored as a variable and used throughout
Copy the kubectl binary from the HCI node to your Win 10 system
I make it easy on myself by copying the kubectl binary that’s installed as part of the AKS HCI deployment on the HCI cluster node. I use the stored session details to do this. I place it in a directory called c:\wssd on my workstation as it matches the AKS HCI deployment location.
Install Chocolatey
The recommended way to install Helm on Windows is via Chocolatey, per https://helm.sh/docs/intro/install/, hence the need to install Choco. You can manually install it via https://chocolatey.org/install.ps1, but my script does it for you.
Install Helm via Choco
Once Choco is installed, we can go and grab helm by running:
choco install kubernetes-helm -yGet the latest Container Insights deployment script
Microsoft have provided a PowerShell script to enable monitoring of Arc managed K8s clusters here.
Full documentation on the steps are here.
Get the config files for all the AKS HCI clusters deployed to the HCI cluster
This is where we use the AksHci module to obtain the config files for the clusters we have deployed. First, we get a list of all the deployed AKS HCI clusters with this command:
get-akshciclusterThen we iterate through those objects and get the config file so we can connect to the Kubernetes cluster using kubectl. Here’s the command:
get-akshcicredential -clustername $AksHciClusternameOnboard the cluster to Arc if not already completed
First, we check to see if the cluster is already onboarded to Arc. We construct the resource Id and then use the Get-AzResource command to check. If the resource doesn’t exist, then we use the Install-AksHciArcOnboarding cmdlet to get the cluster onboarded to our desired subscription, region and resource group.
$aksHciCluster = $aksCluster.Name
$azureArcClusterResourceId = "/subscriptions/$subscriptionId/resourceGroups/$resourceGroup/providers/Microsoft.Kubernetes/connectedClusters/$aksHciCluster"

#Onboard the cluster to Arc
$AzureArcClusterResource = Get-AzResource -ResourceId $azureArcClusterResourceId
if ($null -eq $AzureArcClusterResource) {
            Invoke-Command -Session $session -ScriptBlock { Install-AksHciArcOnboarding -clustername $using:aksHciCluster -location $using:location -tenantId $using:tenant -subscriptionId $using:subscriptionId -resourceGroup $using:resourceGroup -clientId $using:appId -clientSecret $using:password }
            # Wait until the onboarding has completed...
            . $kubectl logs job/azure-arc-onboarding -n azure-arc-onboarding --follow
        }
Deploy the Container Insights solution to each of the clusters
Finally, we use the enable-monitoring.ps1 script with the necessary parameters to deploy the Container Insights solution to the Kubernetes cluster.
NOTE
At the time of developing the script, I found that I had to edit the veriosn of enable-monitoring.ps1 that was downloaded, as the helm chart version defined (2.7.8) was not available. I changed this to 2.7.7 and it worked.
The current version of the script script on GitHub is now set to 2.7.9, which works.
If you do find there are issues, it is worth trying a previous version, as I did.
You want to look for where the variable $mcrChartVersion is set (line 63 in the version I downloaded) and change to:
$mcrChartVersion = "2.7.7"Putting It Together: The Script
With the high level steps described, go grab the script.
You’ll need to modify it once downloaded to match your environment. The variables you need to modify are listed below and are at the beginning of the script. (I didn’t get around to parameterizing it; go stand in the corner, Danny! :) )
$hcinode = '<hci-server-name>'
$resourceGroup = "<Your Arc Resource Group>"
$location = "<Region of resource>"
$subscriptionId = "<Azure Subscription ID>"
$appId = "<App ID of Service Principal>"
$password = "<Ap ID Secret>"
$tenant = "<Tenant ID for Service Principal>"
Hopefully it’s clear enough that you’ll need to have created a Service Principal in your Azure Sub, providing the App Id, Secret and Tenant Id. You also need to provide the Subscription of the Azure Sub you are connecting Arc to as well as the Resource Group name. If you’re manually creating a Service principal, make sure it has rights to the Resource Group (e.g. Contributor)
Reminder
Follow Steps 1 - 5 in the following doc to ensure the pre-reqs for Arc onboarding are in place. https://docs.microsoft.com/en-us/azure-stack/aks-hci/connect-to-arc
When the script is run, it will retrieve all the AKS HCI clusters you have deployed and check they are onboarded to Arc. If not , it will go ahead and do that. Then it will retrieve the kubeconfig file, store it locally and add the path to the file to the KUBECONFIG environment variable. Lastly, it will deploy the Container Insights monitoring solution.

Here is an example of the Arc onboarding logs

and here is confirmation of successful deployment of the Container Insights for Containers solution to the cluster.
What you will see in the Azure Portal for Arc managed K8s clusters:

Before onboarding my AKS HCI clusters…

..and after
Here’s an example of what you will see in the Azure Portal when the Container Insights solution is deployed to the cluster, lots of great insights and information are surfaced:

On my local system, I can administer my clusters now using Kubectl and Helm. Here’s an example that shows that I have multiple clusters in my config and has specific contexts :

The config is derived from the KUBECTL environment variable. Note how the config files I retrieved are explicitly stated:

I’m sure that as AKS HCI matures, more elegant solutions to enable remote management and monitoring will be available, but in the meantime, I’m pretty pleased that I achieved what I set out to do.
Deploying AKS HCI Gotchas
I’ve been testing AKS HCI for a couple of months now, and I’m really excited about it as a platform and the possibilities it unlocks.
In the course of my testing, I’ve encountered some problems and undocumented steps that need to be configured to unsure that when you deploy your cluster, you are more likely to have success. Here’s a list in no particular order:
Using the PowerShell module is more efficient than using Windows Admin Center
Currently, you can only run the PowerShell modules directly on a HCI Node
I’ll try and add to the list as and when I come across other gotchas
Using the PowerShell module is more efficient than using Windows Admin Center
I’ve tested deployments using both WAC and the PowerShell module and I’ve found using the latter gives the more consistent experience.
When first setting up AKS on the HCI cluster via WAC, a number of binaries / agents / scripts / OS images are downloaded to a working directory on the system running WAC before being copied to a CSV on the cluster. If you restart the wizard for whatever reason, all the contents of this working directory are wiped and downloaded again. I’ve found that with WAC, all the possible K8s Linux images are downloaded (at approx. 4 - 4.5 GB per image):
As you can see above, the Windows image is even larger. You may not want to run Windows workloads at the moment, but you’ve got to get the image no matter what.
The PowerShell module is more efficient, as it only downloads the image you require at that time. You can also specify an image store directory for the images when deploying to a cluster. This directory is persistent, so if you need to re-run installations due to failures, at least the time taken to download the images is saved.
Make sure your HCI Cluster has the correct rights in AD
On a couple of occasions, I’ve come across issues which have been resolved by making sure that the Azure Stack HCI Cluster has been correctly configured within Active Directory. As the AKS HCI installer (both PowerShell and WAC based) creates a generic service on the cluster to run the ‘Cloud Agent’ which is required as part of the deployment, the cluster computer object needs the rights to create (and delete) Computer objects at least.
Here’s an example of an error I encountered when it wasn’t configured:
For anyone interested, this is how to configure AD to resolve the problem:
Open dsa.msc (Active Directory Users and Computers) as a user with rights to modify security on the OU that the cluster computer object is located in.
Make sure the ‘Advanced Features’ option is selected within the View menu, to expose the Security tab within the OU properties.
Navigate to the OU where the HCI Cluster computer object is located in (in the example above, it is in the default Computer OU). Right click and select Properties.
From the resultant window, click on the Security tab, then Advanced
Click on Add
Click on Add, then Select a principal (1). Make sure you add the Computer Object type (2), enter the name of the HCI Cluster in the object name, chcek it is valid and click OK (3).
Make sure that the Create and Delete Computer Objects permissions are selected and then click OK. on the open windows to assign the permission.
Currently, you can only run the PowerShell modules directly on a HCI Node
This is for awareness, but you must run the AKS HCI PowerShell modules on a HCI node, PowerShell remoting is not supported currently. So you will need to RDP to the server to do this.
Pre-create a WSSD directory on your CSV
For version 0.2.8 of the AksHci PowerShell Module, I found that the kube-config yaml file attempts to be stored in a directory called wssd on the CSV that you specify when setting the config (e.g. if you specify the following: Set-AksHciConfig -deploymentType MultiNode -wssdImageDir 'C:\ClusterStorage\Volume01\wssdImages' -cloudConfigLocation C:\ClusterStorage\Volume01\aks-clus01-config -vnetName Computeswitch, the install routine would attempt to store the kube-config file in C:\ClusterStorage\Volume01\wssd).
If the wssd directory does not exist prior to installation, the routine will error. To get around this, create the directory beforehand.
Error During install routine
Running the command that throws the error shows more detail
Creating the WSSD dir and re-running the command fixes the problem

Rotating App Service Certificates on Azure Stack Hub
If anyone has seen my previous post about using Lets Encrypt open source certificates with Azure Stack Hub may remember that those certs have a 90 day lifetime. This means that if you do use them, you’ll need to rotate your certificates on a more regular cadence than the normal 1 year with paid for third party cert authorities. For me, this isn’t a problem as it adds only a small amount of overhead to managing my stamps, assisted by helper scripts to generate the certs and some clear documentation on the process for rotating the core infra SSL Certs (found here).
What isn’t so clear is how to rotate the certs for your App Service PaaS infrastructure. I haven’t found any easily findable (is that a word?) reference to it in the online documentation. Not to worry, it’s actually a fairly simple process and I’ve recorded step-by-step how to perform it.
One thing I’ll point out first - you won’t find any alerts regarding impending App Service certificates expiration like you do with the core infrastructure, so you’ll have to make a note in your calendar for a suitable date to renew your certs, or just periodically check the admin portal.
From the Admin Portal, open up the App Service blade
Open the Secrets blade
From here you can check how many days you have left until your certs expire. As you can see in my case I have 11 days, so time to rotate!
Selecting the Rotate button brings up a new blade. From here you provide the locations of the Default App Service pfx cert, API pfx, FTP (or publishing) pfx and the SSO (or Identity Application) pfx, along with the corresponding passwords for these files.
Once you have entered these details and clicked OK, the Certificate Rotation status window will show you the progress of the task
You can navigate from this screen and do other tasks if you want. You can click on the Status button to check on the progress.
What you should see if the details you entered were validated.
Success!
The whole process took between 15-20 minutes. I wasn’t sure as I went and got a coffee!
Just to check that the certificates have actually been updated, I refreshed the Secrets blade and saw that the expiry was now 90 days, per the new Lets Encrypt certs I created.
Hopefully this is of some use to fellow Azure Stack Hub operators who haven’t had to update their App Service Certs yet, and remember, you won’t be alerted if they do expire!
Topic Search
-
 Securing TLS in WAC (Windows Admin Center) https://t.co/klDc7J7R4G
Posts by Date
- March 2025 1
- February 2025 1
- October 2024 1
- August 2024 1
- July 2024 1
- October 2023 1
- September 2023 1
- August 2023 3
- July 2023 1
- June 2023 2
- May 2023 1
- February 2023 3
- January 2023 1
- December 2022 1
- November 2022 3
- October 2022 7
- September 2022 2
- August 2022 4
- July 2022 1
- February 2022 2
- January 2022 1
- October 2021 1
- June 2021 2
- February 2021 1
- December 2020 2
- November 2020 2
- October 2020 1
- September 2020 1
- August 2020 1
- June 2020 1
- May 2020 2
- March 2020 1
- January 2020 2
- December 2019 2
- November 2019 1
- October 2019 7
- June 2019 2
- March 2019 2
- February 2019 1
- December 2018 3
- November 2018 1
- October 2018 4
- September 2018 6
- August 2018 1
- June 2018 1
- April 2018 2
- March 2018 1
- February 2018 3
- January 2018 2
- August 2017 5
- June 2017 2
- May 2017 3
- March 2017 4
- February 2017 4
- December 2016 1
- November 2016 3
- October 2016 3
- September 2016 5
- August 2016 11
- July 2016 13