
Fixing the SQL / MySQL RP update procedure on Azure Stack Hub 1910
Anyone who has been running and operating Azure Stack Hub for a while is hopefully aware that there are a number of activities that need to take place to keep it up to date and supported. The most obvious one is updating the core infrastructure using the integrated update process. It’s made easier in that the main dashboard on the admin portal for your stamp informs you of the update status - if it’s up to date or if there’s an update to apply. When it comes to additional Resource Providers, you have to do the work your self. This post details how to fix the update process for the SQL and MySQL RP’s for systems running version 1910.
I’m making the assumption that you have already deployed the RP’s previously, and have access to the pfx file that contains the sqladapter certificate for your stamp.
Version 1910 of Azure Stack Hub requires version 1.1.47.0 of the SQL & MySQL Resource Providers.
The first thing you will need to do is download the respective RP install binaries:
SQL RP can be found here: https://aka.ms/azurestacksqlrp11470
MySQL RP can be found here: https://aka.ms/azurestackmysqlrp11470
Extract the contents of the downloaded file(s) on a system that has access to the PEP and also has the compatible Azure Stack Hub PowerShell modules installed for Azure Satck Hub 1910: https://docs.microsoft.com/en-us/azure-stack/operator/azure-stack-powershell-install?view=azs-1910
Create a directory in the location where you extracted the RP files called cert. You will need to copy the pfx file containing the certificate for the SQL adapter into this directory. This step is the same for both SQL and MySQL.
We need to modify the common.psm1 file in the Prerequisites folder, similar to an earlier blog post on deploying the RP (based on 1.1.33.0)
Taking a look at the file shows us the prerequisites for the function:
It expects the Azure RM module version to be 2.3.0 and that the installation path for the modules to be \SqlMyslPsh.
If following the official instructions for deploying the Azure Stack PowerShell module compatible with 1910, this will never work, so we need to modify the Test-AzureStackPowerShell function.
Change the $AzPshInstallFolder on line 82 from "SqlMySqlPsh" to "WindowsPowerShell\Modules"
Change the $AzureRmVersion on line 84 from "2.3.0" to "5.8.3"
We need some further changes to the function to ensure that the correct path for the module is evaluated:
Locate line 118/119 in the module.
We need to modify the path so it reflects that of the loaded module. Change the "AzureRM" to AzureRM.Profile", as highlighted in the images below.
N.B. - The instructions for the fix are also applicable for new SQL & MySQL Resource Provider deployments, as they use the common.psm1 module too.
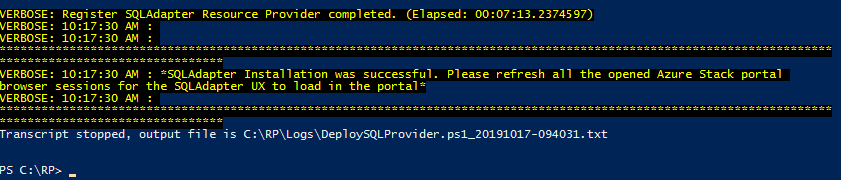
Save the file and using the update script example tailored to your environment, the update should now work.
You should see status messages like below:
Overall, it takes approximately 50 minutes to run through the update.
Deploying the SQL RP with the latest Azure Stack PowerShell module
This is a quick post about how you can use the latest Azure Stack PowerShell module to deploy the SQL resource provider to Azure Stack (1908) , rather than having to use an older version that the RP documentation says you must do (which can be messy, having to remove / install various modules).
If you follow the pre-requisites, you require PowerShell for Azure Stack. Following the link in the pre-reqs gives you the instructions to install the latest version (1.7.2 at time of writing). I followed the instructions for version 1904 and later and that was great.
Further into the SQL RP document, there is a helper script to help you with the deployment. The script states that the modules required are for specific versions, which are outdated for 1908. This actually conflicts with the pre-requirement, as the link is to install version 1.7.2 of the AzureStack Module. I don’t particularly want o remove/install different version of Modules to my system as it is time consuming and unnecessary, IMO. Anyway, I decided to carry on as it may have been an oversight.
Next, I had download version 1.1.33.0 of the SQL RP
I ran the self-extracting exe file and from the extracted directory, I ran from and elevated PowerShell session the DeploySQLProvider.ps1 script
Even though I had followed all the pre-reqs in the article, an exception was thrown as seen below:
As you can see, it is complaining about the Azure Stack PowerShell module. I know that version 2.5.0 and ArmProfile 2019-03-01-hybrid is supported with Azure Stack 1908, so I took a look at the script to find out what was throwing this error.
I did a search for ‘Checking for Azure Stack Powershell Module …’ and it took me to the following :
It looked like the Test-AzureStackPowershell function was the candidate. The function wasn’t defined within the script, so it must have come from some other module. I ran the following commands to get the information I needed:
get-command Test-AzureStackPowerShell

get-module Common | ft Path
You can see the output here; the source of the function was the key to find where it resided:
Now I went and took a look at the Common.psm1 module.
I did a search for a distinct part of the error message that’s thrown - ‘Use ArmProfile 2018-03-01-hybrid’ and it took me to this:
I could see in the elseif statement that it was looking for a minor version equal to 3. Given that I’m running 2.5.0, that was never going to work. So to try and resolve the error, I changed the ‘-eq’ to ‘-ge’, so that it would work for any minor version greater or equal to 3 and above.
I removed the currently loaded Common module:
Remove-Module Common
Then I ran the DeploySQLProvider.ps1 script again:
Bingo! Fixed it. As you can see, it evaluates version 2.5.0 as supported and carries on until the deployment completes successfully…
So it turns out a simple change in the Common module has made life a lot more straightforward.

Using Lets Encrypt certificates with Azure Stack
Anyone who has deployed an Azure Stack integrated system will know that one of the crucial items to get right from the outset are the PKI certificates that will be used for external services, such as the portal, blob storage, ARM API’s. For production environments, Microsoft recommend having separate certificates for each of the endpoints, some of which require wildcard SSL certs. These tend to be more expensive if purchasing from a third party.
Of course, you could use an Enterprise CA based within your environment, but I’ve seen too many issues where intermediate CA’s are used to sign the SSL certificates, due to the public key not existing in the Microsoft or various Linux distro’s Trusted CA publishers store.
Side note: When A VM is provisioned on Azure Stack, only the root CA is imported by the WA agent. The intermediate CA public cert needs to be manually imported.
With all that in mind, I was lucky enough to work with a client who had the idea to cut costs, but to use a CA that is trusted universally; that being Lets Encrypt. As the strapline states on their website, ‘Lets Encrypt is a free, automated and open Certificate Authority’ .
Free? I like how much that costs, there must be a catch? Well, yes and no. The certs have a 90 day lifespan, so you’ll have to ensure you rotate the certificates before they expire, but this can be automated, so not a big deal. The documentation for expiration alerts say that you’ll be alerted when they’re within 30 days, but I’ve found you get warnings within 90 days, so be aware that you don’t just ignore them and they do eventually expire - make a note in your calendar!
So what do we need for this to implement this solution?
Here are the pre-reqs:
An Azure subscription
An Azure DNS Zone for your domain
A Service Principal within your Azure AD tenant
Azure PowerShell modules. If using the AZ modules, the Enable-AzureRmAlias should be set. N.B. This does not work with the Azure Stack PowerShell modules, as the AzureRM.Dns modules currently included do not support the creation of CAA records - we need this capability!
Azure Stack Readiness checker PowerShell Module.
Posh-ACME PowerShell module https://github.com/rmbolger/Posh-ACME
Oh, and my Azure Stack Lets Encrypt PoSh module :)
For anyone wondering how to setup Azure DNS zones for use with Azure Stack, please see my blog post here.
Assuming you’ve installed / imported / configured / downloaded all of the pre-reqs, extract the contents of the zip file downloaded for the Azure Stack Lets Encrypt Module and then:
1. Run the new-DNSTxtRole.ps1 script that is included within the Azure Stack Lets Encrypt zip file. It will prompt you for your credentials to connect to your Azure Subscription and then create a new called ‘DNS Zone Contributor’ within your subscription that you can use to assign least privileges to the Service Principal on your Resource Group that contains your DNS Zone. It restricts rights to creating TXT records so that Lets Encrypt can use them to verify that you are in fact the owner of the domain.
Here’s what the script contains:
# Use this to create a role to assign to service principal used by Posh-Acme

$profile = Connect-AzureRMAccount

$roleDef = Get-AzureRmRoleDefinition -Name "DNS Zone Contributor"
$roleDef.Id = $null
$roleDef.Name = "DNS TXT Contributor"
$roleDef.Description = "Manage DNS TXT records only."
$roleDef.Actions.RemoveRange(0,$roleDef.Actions.Count)
$roleDef.Actions.Add("Microsoft.Network/dnsZones/TXT/*")
$roleDef.Actions.Add("Microsoft.Network/dnsZones/read")
$roleDef.Actions.Add("Microsoft.Authorization/*/read")
$roleDef.Actions.Add("Microsoft.Insights/alertRules/*")
$roleDef.Actions.Add("Microsoft.ResourceHealth/availabilityStatuses/read")
$roleDef.Actions.Add("Microsoft.Resources/deployments/read")
$roleDef.Actions.Add("Microsoft.Resources/subscriptions/resourceGroups/read")
$roleDef.AssignableScopes.Clear()
$roleDef.AssignableScopes.Add("/subscriptions/$($profile.Context.Subscription.Id)")

$role = New-AzureRmRoleDefinition $roleDef
$role
2. Add your Service Principal to your DNS Zone as a ‘DNS Zone Contributor’. I named my Service Principal LetsEncryptAzureStack in this example.
From the portal, find your DNS Zone resource, and select Access Control (IAM). From the blade that opens, select +Add.
Select the DNS Zone Contributor as for the Role
In the Select field, type in the name of your Service Principal. Select it, then press Save
3 Now we need to create some CAA records within the domain. This is required by Lets Encrypt in order to create the certificates. I created a function within the module to handle this. From an elevated PowerShell session navigate to the folder you extracted the module to and run:
Import-Module .\AzSLetsEncrypt.psm1
Once imported, ensure you’ve connected to your Azure Subscription within PowerShell and run the following:
#Connect to Azure
Connect-AzureRmAccount
New-AzsDnsCaaRecords -ResourceGroup <ResourceGroup> -Region <Azure Stack Region Name> -FQDN <FQDN for the DNZ Zone> -PaaS
Enter the Resource Group that hosts your DNS Zone, The name of your Azure Stack region and the FQDN for the domain. Optionally, if you specify the PaaS switch, it will create the CAA records for the PaaS endpoints too. If everything is in place, you should hopefully see something that looks like this in your Azure DNS Zone: This step only has to be run once, unless you delete the CAA records.
4 Now we’ve got all of that in place, we can create our certificates! Assuming you’ve still got the module imported, you can use the New-AzsPkiLECertificates function to create your certs. Rather than explain all the options, I’ve created a wrapper script :
$DebugPreference = 'continue'

$Region = '<Azure Stack Region Name>'
$FQDN = '<FQDN>'
$DNSResourceGroup = '<DNS Zone Resource Group>'

$Params = @{
 RegionName = $Region
 FQDN = $FQDN
 ServicePrincipal = '<Service Principal GUID>'
 ServicePrincipalSecret = '<Service Principal Secret>'
 pfxPass = 'P@ssword!'
 SubscriptionId = '<Subscription ID>'
 TenantId = '<Tenant ID>'
 CertPath = 'c:\azsCerts'
}

$scriptpath = $PSScriptRoot
cd $scriptpath
import-module .\AzSLetsEncrypt.psm1


#New-AzsDnsCaaRecords -ResourceGroup $DNSResourceGroup -Region $Region -FQDN $FQDN -PaaS
New-AzsPkiLECertificates @Params -Force -paas
The function will create the core certificates and if you select the PaaS switch, the optional App service and SQL RP certs. It will take a while to run as, as there is an element of waiting for the TXT records that are created for validation to replicate.
Once all the certificates have been created, they are validated to ensure they are compatible for use with Azure Stack using the Microsoft.AzureStack.ReadinessChecker module.:
Once the script has completed, you should have a folder structure that looks like this:
I’ve used these certificates in two installations now and they’ve worked with no problems.
As the Posh-Acme module is used to generate the certs, the data is stored here:
%userprofile%\AppData\Local\Posh-ACME
If you need to recreate the certs before the allowed renewal period within the Posh-ACME module, or have some issues, you can delete the sub folders in this location and re-run the script.
The folder structure that’s generated should match the requirements for the Azure Stack install routine / certificate rotation. Check out the documentation here on how to rotate the certificates if they’re coming towards their expiration date.
I hope this is of some use and allows you to save some money!

Azure Stack User Defined Routing Problem
I'm writing this post to highlight a problem I've encountered with User Defined Routes/Route Tables, and their implementation on Azure Stack. I'll not go into detail on when to use UDR's; the official documentation does a great job of that: https://docs.microsoft.com/en-us/azure/virtual-network/virtual-networks-udr-overview#custom-routes
Typically you would use a UDR within an Azure Stack tenant's VNet when you want to direct internet bound traffic via a third party network virtualized appliance (e.g. Firewall).
I'll qualify what I mean by 'Internet'. For Public Azure, Microsoft refer to any network within a virtual network as 'internet' that doesn't have a route entry as defined within the SDN (typically route entries will exist for the virtual network/subnets and BGP advertised routes such as peered VNets, ExpressRoute networks, etc). For unknown/external networks, it will forward the request on to the default gateway and via the Azure fabric to pop out onto the internet. If an Azure Stack based VNet encounters an unknown/external network, it will forward the traffic via the SDN to the upstream border switch, which in turn is connected to the corporate network. For disconnected deployments, there may not be a route out to the internet, but there will to the customer network.
Here's a couple of comments I have about this
Microsoft appear to use the same code base for Azure / Azure Stack for UDR's. There is no differentiation between the two platforms, which can cause a problem, as will be highlighted shortly.
For Azure Stack, the term 'Internet' is incorrect in my opinion. Think of 'internet' within Azure Stack as any network external to the appliance.
Now I've described that, here's a scenario and an issue I have encountered.
An Azure tenant deploys a virtual network and they want to control outbound access from the VM's via a firewall appliance. They want to be able to perform remote admin for VM's via a jump server from a secure admin workstation (SAW). They connect to the jump server via a Public IP associated with the jump server NIC. Nothing exotic is being suggested here and is a perfectly normal deployment scenario.
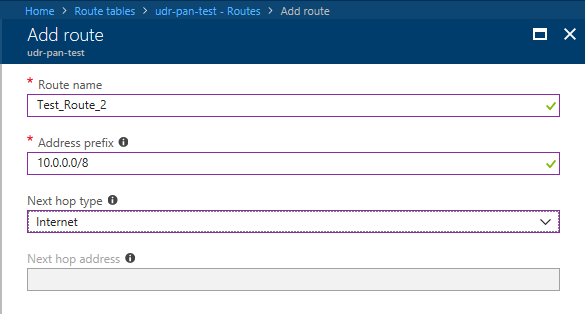
In theory, a UDR is associated to the subnet where the VM's are connected to (10.0.0.128/25) for address prefix 0.0.0.0/0 with next hop as the firewall IP address (10.0.0.4). In order not to cause an issue with routing or spoofing protection within the firewall, another route is added, with the address prefix being 172.16.100.24/32 and the next hop being 'Internet' (remember, Internet should be thought of as external network to the Azure Stack appliance!). Due to longest prefix matching rules being applied, the more specific /32 route will take preference over the /0 route, allowing for the firewall to be bypassed and allowing the SAW to connect via the Public IP.
That's the theory, but here's the problem:
The Corporate network is using an address space that's in the IANA Private use IP range ( https://www.iana.org/assignments/iana-ipv4-special-registry/iana-ipv4-special-registry.xhtml ) which is fairly common practice for the majority of enterprise networks. The problem is that I am unable to assign a UDR using an address prefix in any of these private ranges with the next hop as 'internet', as the validation for the route is expecting it to be in Public Address Space.
Exhibit a:


I have tested for the other Private ranges too and get the same outcome.
Obviously for Public Azure, this is not an issue and the validation will do it's job, but that's the problem in using sharing the code with Azure Stack, you don't know what state the customer network is in and what address space they have in use.
I've raised a support case as it will clearly be a problem for some customers, but at this time, I don't have any workaround. This is the case for all Azure Stack versions as of writing (1901).
Now, I'm guessing that by removing the validation step, it would fix the problem. It would be nice to rename the next hop type to 'External Network', or something more appropriate whilst they're at it :)

Adding Public IP Pools to Azure Stack
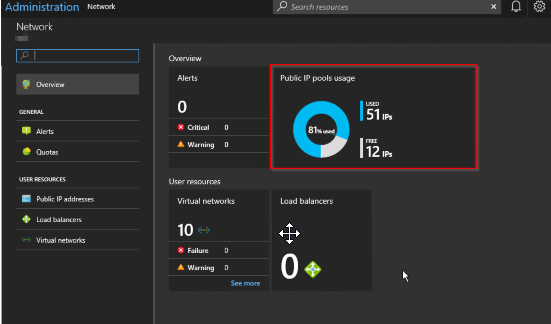
Azure Stack offers the ability to add Public IP Pools should the one you provided when the installation took place not be sufficient for your needs going forward. Typically this will be the case when an operator starts to receive alerts in the Admin portal like this:
OK, so this may be an intermittent warning, happening once every so often. If so, I suggest there's no need to take any action. However, if you get an alert warning of 90% utilization across all pools, it's time to take action, and that is to look into adding an extra pool.

Azure Stack offers the ability to add Public IP Pools should the one you provided when the installation took place not be sufficient for your needs going forward. Typically this will be the case when an operator starts to receive alerts in the Admin portal like this:

OK, so this may be an intermittent warning, happening once every so often. If so, I suggest there's no need to take any action. However, if you get an alert warning of 90% utilization across all pools, it's time to take action, and that is to look into adding an extra pool.
Reading the remediation steps make it sound straightforward, and the parts it lists are, but in reality it takes a deal of planning and configuration to implement.
The instructions listed here allude to the fact that the Azure Stack OEM is required to carry out some configuration on the Top of Rack switches. Why?
Well, as part of the initial installation of Azure Stack, all the configuration of the switches is automated and is then locked down so to prevent tampering and compromising the platform. This is achieved at the switch level by applying ACL's, controlling what traffic is allowed to ingress/egress from specific address ranges. The OEM has to add additional ACL's for the new Public IP range to ensure the veracity of the configuration and that your appliance acts as you would expect; e.g. external traffic trying to access services that have Public IP address in the new pool is allowed, not dropped at the switch.
Something else to be considered is whether your network service provider uses static routing, rather than BGP to advertise routing changes. If they use static routing, then they must add in the specific routes to forward traffic to the Top of Rack Switch transit networks. They will have had to do some similar configuration when Azure Stack was deployed, so they should already have the pertinent details.
Here are my more comprehensive steps that need to be carried out
1. Acquire another block of IP addresses from your network services provider. They need to make sure that they will be routable and do not overlap with existing addresses within the WAN.
2. Contact the Azure Stack OEM and arrange with them to configure the Top Of Rack Switches to add the new Public IP address range(s).
3. (Optional) If your network service provider uses static routing, rather than BGP to advertise routing changes, they must add in the specific routes to forward traffic to the Top of Rack Switch transit networks.
4. An Azure Stack Operator should sign into the admin portal

5. Open the Network Resource Provider blade and select Public IP pool usage
6.Click Add IP Pool and add the new Public Address range in CIDR format

7.Make sure the details look correct and click OK to apply *.

A word of warning - make sure you enter the details correctly as adding a new address pool via the portal is not reversible! If you do make a mistake, a call to Microsoft Support would be needed.
In the future, this process might be automated, but my advice is that at the planning stage, you supply a /22 address range (1022 IP addresses) to save yourself (and your tenants) the hassle
Topic Search
-
 Securing TLS in WAC (Windows Admin Center) https://t.co/klDc7J7R4G
Posts by Date
- March 2025 1
- February 2025 1
- October 2024 1
- August 2024 1
- July 2024 1
- October 2023 1
- September 2023 1
- August 2023 3
- July 2023 1
- June 2023 2
- May 2023 1
- February 2023 3
- January 2023 1
- December 2022 1
- November 2022 3
- October 2022 7
- September 2022 2
- August 2022 4
- July 2022 1
- February 2022 2
- January 2022 1
- October 2021 1
- June 2021 2
- February 2021 1
- December 2020 2
- November 2020 2
- October 2020 1
- September 2020 1
- August 2020 1
- June 2020 1
- May 2020 2
- March 2020 1
- January 2020 2
- December 2019 2
- November 2019 1
- October 2019 7
- June 2019 2
- March 2019 2
- February 2019 1
- December 2018 3
- November 2018 1
- October 2018 4
- September 2018 6
- August 2018 1
- June 2018 1
- April 2018 2
- March 2018 1
- February 2018 3
- January 2018 2
- August 2017 5
- June 2017 2
- May 2017 3
- March 2017 4
- February 2017 4
- December 2016 1
- November 2016 3
- October 2016 3
- September 2016 5
- August 2016 11
- July 2016 13