The process cannot access the file psconfig.json because it is being used by another process

If you have been having issues deploying Azure Arc Resource Bridge on AKS and running into various issues like the one above for Azure Stack HCI. Microsoft has recently published new guidance. Some pages still have conflicting messaging. I hope this pointer might help someone else.
We do NOT recommend or support running AKS on Azure Stack HCI and Azure Arc Resource Bridge on the same Azure Stack HCI or Windows Server cluster. If you have AKS on Azure Stack HCI installed, run Uninstall-AksHci and start deploying your Azure Arc Resource Bridge from scratch.
https://learn.microsoft.com/en-us/azure/aks/hybrid/troubleshoot-aks-hybrid-preview#issues-with-using-aks-hci-and-azure-arc-resource-bridge
MAAS Image Builder Exclude Update by KB#
This briefly shows how to alter the image builder scripts to exclude broken KBs for specific OS versions. This example shows excluding Cumulative Update for Windows 11 Insider Preview (KB5019765) on an HCI image.
Trying to build a newer HCI Maas image and receive an error trying to download an update via release channel. Specifically, Windows 11 insider preview KB5019765
If you edit the Logon.ps1 found in the UnattendedResource folder from cloudbase/windows-imaging-tools: Tools to automate the creation of a Windows image for OpenStack, supporting KVM, Hyper-V, ESXi and more. (github.com) you can see there is a section that allows you to create a blacklist of KBs for different OS version.
Using PowerShell [System.Environment]::OSVersion.Version you can find the OS version
Finally add a record for the OS version and KB you want to exclude

Which is displayed via verbose output during build


Creating an Azure Stack HCI Image for MAAS
This blog is a follow on from Creating a MAAS Image Builder Server (Windows Server 2022 example) — Crying Cloud the goal here is to create a MAAS usable Azure Stack HCI image for deployment with MAAS. This is still using the component from cloudbase/windows-imaging-tools: Tools to automate the creation of a Windows image for OpenStack, supporting KVM, Hyper-V, ESXi and more. (github.com) this repo.

The primary issue is if you try to “generalize” an HCI image, if you attempt to use that prepped image, you get the perpetual error “Windows could not finish configuring the system. To attempt to resume configuration, restart the computer”

However, if you don’t “generalize” the HCI base image, the deployment works. The problem with using the existing tools/repo and scripts is creating a MAAS image with this option not to generalize it.
The following content is assuming the layout as described here Creating a MAAS Image Builder Server (Windows Server 2022 example) — Crying Cloud.
Looking into the file C:\BuilderFiles\windows-openstack-imaging-tools\UnattendResources\Logon.ps1 around line 714 we find the command that is calling sysprep.exe
& "$ENV:SystemRoot\System32\Sysprep\Sysprep.exe" `/generalize `/oobe `/shutdown `/unattend:"$unattendedXmlPath"Without breaking the ability to build other images or have a complete clone of the repo we need to make a few changes. Being able to have a parameter in the ini file makes sense. Create a copy of the ini file C:\BuilderFiles\Scripts\config-Server-HCI-UEFI.ini. I have added a parameter to the [sysprep] section run_sysprep_generalize=False. The differences between the 2022 file and HCI are as follows.
# config-Server-HCI-UEFI key diff to config-Server-2022-UEFI

image_name=Azure Stack HCI SERVERAZURESTACKHCICORE
image_path=C:\BuilderFiles\Images\HCI.10.2022.tgz
custom_scripts_path="C:\BuilderFiles\scripts\HCICS"
unattend_xml_path="UnattendTemplateHCI.xml"

# new parameter in section
[sysprep]
run_sysprep_generalize=False
I have created a copy of unattendTemplate2022.xml and save as unattendTemplateHCI.xml stored here C:\BuilderFiles\windows-openstack-imaging-tools with the following changes.
# Delete the following component from specialize node
#     <settings pass="specialize">

        <component name="Microsoft-Windows-TerminalServices-LocalSessionManager" processorArchitecture="amd64" publicKeyToken="31bf3856ad364e35" language="neutral" versionScope="nonSxS" xmlns:wcm="http://schemas.microsoft.com/WMIConfig/2002/State" xmlns:xsi="http://www.w3.org/2001/XMLSchema-instance">
            <fDenyTSConnections>false</fDenyTSConnections>
        </component>
        <component name="Microsoft-Windows-TerminalServices-RDP-WinStationExtensions" processorArchitecture="amd64" publicKeyToken="31bf3856ad364e35" language="neutral" versionScope="nonSxS" xmlns:wcm="http://schemas.microsoft.com/WMIConfig/2002/State" xmlns:xsi="http://www.w3.org/2001/XMLSchema-instance">
            <UserAuthentication>0</UserAuthentication>
        </component>
        <component name="Networking-MPSSVC-Svc" processorArchitecture="amd64" publicKeyToken="31bf3856ad364e35" language="neutral" versionScope="nonSxS" xmlns:wcm="http://schemas.microsoft.com/WMIConfig/2002/State" xmlns:xsi="http://www.w3.org/2001/XMLSchema-instance">
            <FirewallGroups>
                <FirewallGroup wcm:action="add" wcm:keyValue="RemoteDesktop">
                    <Active>true</Active>
                    <Profile>all</Profile>
                    <Group>@FirewallAPI.dll,-28752</Group>
                </FirewallGroup>
            </FirewallGroups>
        </component>
Next is changes to C:\BuilderFiles\windows-openstack-imaging-tools\UnattendResources\Logon.ps1
# line  575 under
#     if ($installQemuGuestAgent -and $installQemuGuestAgent -ne 'False') {
#        Install-QemuGuestAgent
#    }

# add the following get-ini parameter call

    try {
        $generalizeWindowsImage = Get-IniFileValue -Path $configIniPath -Section "sysprep" -Key "run_sysprep_generalize" -Default "True"
    } catch{}
then, lets a simple if statement to flip the call
# line 741 under
# Optimize-SparseImage

if ($generalizeWindowsImage -eq "False") {
    & "$ENV:SystemRoot\System32\Sysprep\Sysprep.exe" `/oobe `/shutdown `/unattend:"$unattendedXmlPath"
} else {
    & "$ENV:SystemRoot\System32\Sysprep\Sysprep.exe" `/generalize `/oobe `/shutdown `/unattend:"$unattendedXmlPath"
}
Next, create the C:\BuilderFiles\Scripts\HCICS folder. Which will also copy in the RunBeforeSysprep.ps1 script for HCI I have added an additional script C:\BuilderFiles\Scripts\HCICS\RunBeforeWindowsUpdates.ps1 with a script to install the pre-requisites needed for HCI clusters.
function Write-Log {
    Param($messageToOut)
    add-content -path "c:\build.log" ("{0} - {1}" -f @((Get-Date), $messageToOut))
}

Write-Log "RunBeforeWindowsUpdate.ps1 starting"

Write-Log "install windows Features"
install-windowsfeature FS-Data-Deduplication,BitLocker,Data-Center-Bridging,Failover-Clustering,NetworkATC,RSAT-AD-PowerShell,RSAT-Hyper-V-Tools,RSAT-Clustering,RSAT-DataCenterBridging-LLDP-Tools

Write-Log "RunBeforeWindowsUpdate.ps1 finished"
And to bring it all together the script to call this Build-HCI.ps1. These can be more normalized but for now, create a separate file with the appropriate parameters.
# Build-HCI.ps1 parameters

Param (
    $VerbosePreference = "Continue",
    $ISOImage =  "C:\BuilderFiles\ISOs\AzureStackHCI_20348.587_en-us.iso",
    $ConfigFilePath = "C:\BuilderFiles\Scripts\config-Server-HCI-UEFI.ini",
    $CloudBuildModules = "C:\BuilderFiles\windows-openstack-imaging-tools"
)
Fingers crossed, let’s run the Build-HCI.ps1 script

After deployment we can RDP to the server, as it is named in MAAS

Let’s try the credentials and add the server to Windows Admin Center

I believe there is room to refine this process and automate more of it, but these are the steps I took to get an Azure Stack HCI image with updates, users and features installed and able to deploy directly to bare metal with MAAS
Deploying Azure Stack HCI 20H2 on PowerEdge R630
Ever since the new version of Azure Stack HCI was announced at Microsoft Inspire 2020, there has been a real buzz about the solution and where it is going. Thomas Maurer has written a great article detailing the technology improvements here. If you haven’t read it, I highly recommend you do!
If you want to get hands-on, there are a few options here to do so:
Deploy the preview to existing Hardware
Deploy on your existing Virtualization platform (use Nested Virtualization)
Deploy to a VM in Azure (using a VM Series that supports Nested Virtualization)
Matt McSpirit has written a fantastic step-by-step guide for deploying to virtualized platforms; again - highly recommend reading it.
You can also check out MSLab https://github.com/microsoft/MSLab which automates the deployment to Hyper-V environments
However, I want to write about deploying to physical hardware that I’m lucky enough to have access to that will be more representative of what real world deployments will look like. I won’t go into the full process, as the Microsoft documentation goes through all the steps, but I will explain how I installed it onto physical servers that aren’t officially supported
Hardware
I have access to a number of Dell EMC PowerEdge R630 servers that were originally used to host ASDK on , so I know they meet the majority of the requirements to run Hyper-V / S2D. Dell EMC don’t officially support this server for HCI, but I’m only using it to kick the tires, so I’m not bothered about that.
Each Server has:
2 x 12 core Xeon E5-2670 processors
384 GB RAM
5 x 480GB SSD drives
Perc H730 mini RAID controller
4 x Emulex 10GB NICs
The only real issue with the list above is the H730 controller. As it is RAID, it could cause issues, and Dell EMC recommend using a HBA330 controller, as per this thread. I don’t have any HBA330’s to hand, so I had to make do and try and make it work (spoiler alert: I did get it working, details later!)
Preparing the Hardware
The first thing I had to do was to ensure that each server was configured correctly from a hardware perspective. To do this, connect to the iDRAC interface for each of the servers and make the following changes, if needed.
First, I had to make sure the Perc R730 controller is set to ‘HBA’ mode.
Navigate to Storage / Controllers
From the Setup tab, I checked the current value for the Controller Mode. It should be set to ‘HBA’
If it isn’t, from the corresponding Action dropdown, select HBA.
From the Apply Operation Mode dropdown, select At Next Reboot and then click on Apply
Next, I navigate to iDRAC Settings / Network. Select the OS to iDRAC Pass-Through tab. Make sure Pass-through configuration is Disabled, and Apply changes if necessary
Reboot the server now for the changes to apply to the controller mode.
Next on the list was to ensure that your BIOS and Firmware are up to date. I used the Sever Update Utility from the LifeCycle controller, as documented here to do this.
Once all that was complete, I could start to deploy the Azure Stack HCI OS.
Installing Azure Stack HCI OS
There’s two things that we need to download; Azure Stack HCI ISO and Windows Admin Center (latest version is 2103.2). To get the necessary files, you need to sign up for the public preview. Fill in your details here and go grab them. WAC can be downloaded here as well.
Once you have the ISO, go ahead and connect to your Virtual Console and connect the Virtual Media (version downloaded via the Eval link is AzureStackHCI_17784.1408_EN-US.iso). On more than one occasion I forgot to click on Map Device, that wasted a few minutes!
To make things a little easier, go to the iDRAC, Server / Setup. Change the First Boot Device to Virtual CD/DVD/ISO and then apply the changes.
Next thing is to restart the server. I had to make sure I didn’t get distracted as after a couple of minutes of running through the BIOS steps, it prompts for you to press any key to boot from the CD/DVD. The image below shows it’s going to try and boot from the Virtual CD…
…and the following is if you don’t press a key in time :)
I won’t detail the installation process of the Azure Stack HCI OS, as there are very little configuration items required, just make sure you select the correct drive/partition to install the OS on (Drive 0 for me, I wiped all the volumes/partitions)
After a while (it can be slow doing an install via the Virtual Media) HCI OS will be installed. You’ll need to set an administrator password on first login.
Once that’s set, the config menu appears.
From here, first thing was for me to confirm I had a valid IP address, so selected 8 and then the NIC I wanted to use for management. The only other thing I really had to do was to set the computer name, so I did that, but I also added the system to a domain, just so I knew that name resolution and networking was working as expected.
I rinsed/repeated for all the servers (4 of them) that I wanted to form my HCI cluster.
Follow the instructions here to deploy the cluster.
Fixing Storage Spaces Direct Deployment
When going through the cluster installation, I did encounter one error that blocked the deployment of S2D. This could be seen in the Failover Cluster Validation report.

List All Disks for Storage Spaces Direct Failed

Bus type is RAID - it should be SAS, SATA or NVMe
Fortunately, we can change this by running the following PowerShell commands
(get-cluster).S2DBusTypes="0x100"

S2DBusTypes should report back as Decimal 256
Running the Cluster Validation again will now report as Success

You can now go ahead and create the S2D cluster :)

Hands on with Azure Arc enabled data services on AKS HCI - part 2
This is part 2 in a series of articles on my experiences of deploying Azure Arc enabled data services on Azure Stack HCI AKS.
Part 1 discusses installation of the tools required to deploy and manage the data controller.
Part 2 describes how to deploy and manage a PostgreSQL hyperscale instance.
Part 3 describes how we can monitor our instances from Azure.
First things first, the PostgreSQL extension needs to be installed within Azure Data Studio. You do this from the Extension pane. Just search for ‘PostgreSQL’ and install, as highlighted in the screen shot below.

I found that with the latest version of the extension (0.2.7 at time of writing) threw an error. The issue lies with the OSS DB Tools Service that gets deployed with the extension, and you can see the error from the message displayed below.

After doing a bit of troubleshooting, I figured out that VCRUNTIME140.DLL was missing from my system. Well, actually, the extension does have a copy of it, but it’s not a part of the PATH, so can’t be used. Until a new version of the extension resolves this issue, there are 2 options you can take to workaround this.
Install the Visual C++ 2015 Redistributable to your system (Preferred!)
Copy VCRUNTIME140.DLL to %SYSTEMROOT% (Most hacky; do this at own risk!)
You can find a copy of the DLL in the extension directory:
%USERPROFILE%\.azuredatastudio\extensions\microsoft.azuredatastudio-postgresql-0.2.7\out\ossdbtoolsservice\Windows\v1.5.0\pgsqltoolsservice\lib\_pydevd_bundle
Make sure to restart Azure Data Studio and check that the problem is resolved by checking the output from the ossdbToolsService. The warning message doesn’t seem to impair the functionality of the extension, so I ignored it.

Now we’re ready to deploy a PostgreSQL cluster. Within ADS, we have two ways to do this.
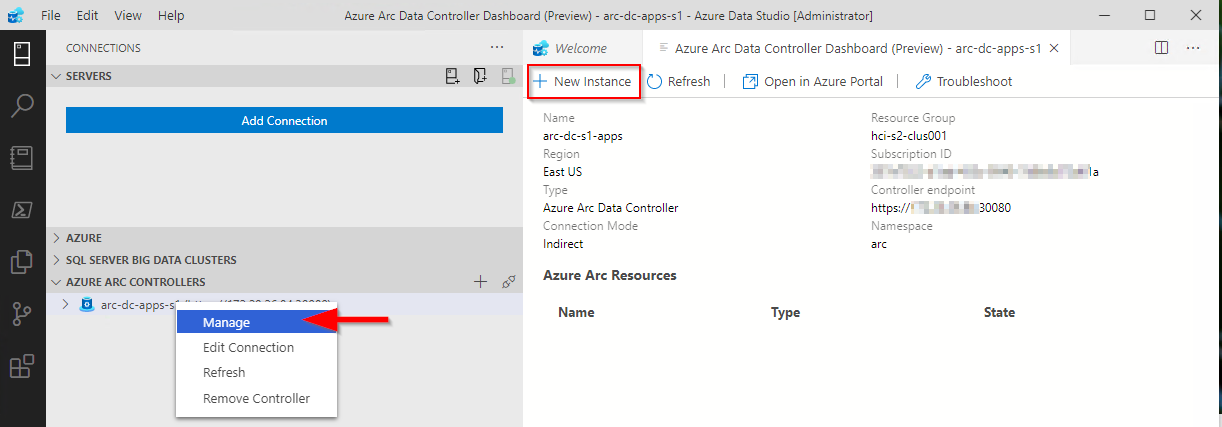
1. Via the data controller management console:
2. From the Connection ‘New Deployment…’ option. Click on the ellipsis (…) to present the option.

Whichever option you choose, the next screen that is presented are similar to one another. The example I‘ve shown is via the ‘New Connection’ path and shows more deployment types. Installing via the data controller dashboard, the list is filtered to what can be deployed to the cluster (the Azure Arc options).

Select PostgreSQL Hyperscale server groups - Azure Arc (preview), make sure that the T&C’s acceptance is checked and then click on Select.
The next pane that’s displayed is where we defined the parameters for the PostgreSQL instance. I’ve highlighted the options you must fill in as a minimum. In the example, I’ve set the number of workers to 3. By default it is set to 0. If you leave it as the default, a single worker is deployed.
Note: If you’re deploying more than one instance to your data controller. make sure to seta unique Port for each server group. The default is 5432

Clicking on Deploy runs through the generated Jupyter notebook.

After a short period (minutes), you should see it has successfully deployed.

ADS doesn’t automatically refresh the data controller instance, so you have to manually do this.

Once refreshed, you will see the instance you have deployed. Right click and select Manage to open the instance management pane.

As you can see, it looks and feels similar to the Azure portal.
If you click on the Kibana or Grafana dashboard links, you can see the logs and performance metrics for the instance.
Note: The Username and password are are what you have set for the data controller, it is not the password you set for the PostgreSQL instance.

Example Kibana logs

Grafana Dashboard
From the management pane, we can also retrieve the connection strings for our PostgreSQL instance. It gives you the details for use with various languages.

Finally in settings, Compute + Storage in theory allows you to change the number of worker nodes and the configuration per node. In reality, this is read-only from within ADS, as changing any of the values and saving them has no effect. If you do want to change the config, we need to revert to the azdata CLI. Jump here to see how you do it.

In order to work with databases and tables on the newly deployed instance, we need to add our new PostgreSQL server to ADS.
From Connection strings on our PostgreSQL dashboard, make a note of the host IP address and port, we’ll need this to add our server instance.

From the Connections pane in ADS, click on Add Connection.
From the new pane enter the parameters:
| Parameter | Value |
|---|---|
| Connection type | PostgreSQL |
| Server name | name you gave to the instance |
| User name | postgres |
| Password | Password you specified for the postgreSQL deployment |
| Database name | Default |
| Server group | Default |
| Name (Optional) | blank |
Click on Advanced, so that you can specify the host IP address and port

Enter the Host IP Address previously noted, and set the port (default is 5432)

Click on OK and then Connect. If all is well, you should see the new connection.

Scaling Your Instance
As mentioned before, if you want to be modify the running configuration of your instance, you’ll have to use the azdata CLI.
First, make sure you are connected and logged in to your data controller.
azdata login --endpoint https://<your dc IP>:30080
Enter the data controller admin username and password

To list the postgreSQL servers that are deployed, run the following command:
azdata arc postgres server list
To show the configuration of the server:
azdata arc postgres server show -n postgres01
Digging through the JSON, we can see that the only resources requested is memory. By default, each node will use 0.25 cores.

I’m going to show how to increase the memory and cores requested. For this example, I want to set 1 core and 512Mb
azdata arc postgres server edit -n postgres01 --cores-request 1 --memory-request 512Mi
If we show the config for our server again, we can see it has been updated successfully

You can also increase the number of workers using the following example
azdata arc postgres server edit -n postgres01 --workers 4Note: With the preview, reducing the number of workers is not supported.

If you do make any changes via azdata, you will need to close existing management panes for the instance and refresh the data controller instance within ADS for them to be reflected.


Currently, there does not appear to be a method to increase the allocated storage via ADS or the CLI, so make sure you provision your storage sizes sufficiently at deployment time.
You can deploy more than one PostgreSQL server group to you data controller, the only thing you will need to change is the name and the port used

You can use this command to show a friendly table of the port that the server is using:
azdata arc postgres server show -n postgres02 --query "{Server:metadata.name, Port:spec.service.port}" --output table
In the next post, I’ll describe how to upload logs and metrics to Azure for your on-prem instances.
Topic Search
-
 Securing TLS in WAC (Windows Admin Center) https://t.co/klDc7J7R4G
Posts by Date
- March 2025 1
- February 2025 1
- October 2024 1
- August 2024 1
- July 2024 1
- October 2023 1
- September 2023 1
- August 2023 3
- July 2023 1
- June 2023 2
- May 2023 1
- February 2023 3
- January 2023 1
- December 2022 1
- November 2022 3
- October 2022 7
- September 2022 2
- August 2022 4
- July 2022 1
- February 2022 2
- January 2022 1
- October 2021 1
- June 2021 2
- February 2021 1
- December 2020 2
- November 2020 2
- October 2020 1
- September 2020 1
- August 2020 1
- June 2020 1
- May 2020 2
- March 2020 1
- January 2020 2
- December 2019 2
- November 2019 1
- October 2019 7
- June 2019 2
- March 2019 2
- February 2019 1
- December 2018 3
- November 2018 1
- October 2018 4
- September 2018 6
- August 2018 1
- June 2018 1
- April 2018 2
- March 2018 1
- February 2018 3
- January 2018 2
- August 2017 5
- June 2017 2
- May 2017 3
- March 2017 4
- February 2017 4
- December 2016 1
- November 2016 3
- October 2016 3
- September 2016 5
- August 2016 11
- July 2016 13